
An RV metal garage is the single most effective way to protect your significant investment from sun, rain, snow, and hail. Think of it as more than just a cover—these durable steel structures are a permanent, secure home for your motorhome, preserving its value and cutting down your long-term maintenance costs.
Why Choose a Metal Garage for Your RV
Your RV is more than a vehicle; it’s your ticket to adventure and a major financial asset. Leaving it out in the open or paying for a spot in an expensive, insecure rental lot can lead to quick depreciation and a long list of costly repairs. This is where a dedicated RV metal garage steps in, offering a robust solution that pays for itself over the years.
Imagine a metal garage as a full-time shield for your RV. It’s constantly defending the exterior from harsh UV rays that fade paint and crack decals. It stops water from rain and snow from getting in, preventing the kind of devastating leaks and mold that can ruin an interior. Unlike a flimsy tarp or fabric cover, a steel structure offers unwavering protection against high winds, heavy snow, and falling debris.
Superior Durability and Low Maintenance
One of the best reasons to go with steel is its incredible resilience and near-zero upkeep. Wood structures are always at risk from rot, termites, and fire, and they demand regular painting or staining just to keep them from falling apart. Metal, on the other hand, is built to resist all of those problems right from the start.
This means you get to spend less time and money on maintenance and more time planning your next trip. A quick wash-down once or twice a year is usually all it takes to keep your garage looking brand new—a far cry from the constant work traditional buildings require. For a deeper dive, check out the key differences between steel and wood buildings in our detailed comparison.
A metal garage isn't just a purchase; it's a long-term investment in asset protection. By shielding your RV from the primary causes of wear and tear, you directly preserve its resale value and operational lifespan.
Cost-Effectiveness and Growing Demand
While the initial investment is obviously a factor, RV metal garages often come out ahead as a more affordable solution than building a traditional wood-frame garage of the same size. The market is catching on, too. The U.S. metal carports market, which includes these specialized garages, is projected to grow from $512.39 million to $756.71 million by 2032. This trend shows a clear shift as people look for reliable storage that delivers the best return on their investment.
How to Correctly Size Your RV Metal Garage
Picking the right size for your RV metal garage is probably the most critical decision you'll make. Get it wrong, and you're stuck with a building that's either a frustratingly tight squeeze or an oversized, costly mistake. It's like buying shoes for a kid—you have to fit them now but also leave a little room to grow.
This isn't just about the simple length and width of your rig. You need to think about the "living space" around your RV. That means accounting for slide-outs, awnings, and that big AC unit on the roof. You also need enough room to walk around, do maintenance, and store your gear without sucking in your stomach. A garage that’s too snug turns a simple oil check into an infuriating game of Twister.
Start with Precise Measurements
Before you even glance at garage styles, grab a tape measure. Get the real-world dimensions of your RV as it sits today, not what the brochure says. Manufacturer specs often don't include that new satellite dish or the bike rack you added last year.
Here’s a quick checklist to get the numbers you actually need:
- Total Length: Measure from the tip of the front bumper (or hitch) all the way to the absolute back—be that a spare tire, ladder, or cargo carrier.
- Total Width: This is a big one people miss. Extend all your slide-outs and measure from the widest point on one side to the widest on the other.
- Total Height: Find the highest point on your roof, which is usually an air conditioner or a vent cover. Place a level on it, extend it out, and measure straight down to the ground for a truly accurate height.
With these three numbers, you have your RV's absolute minimum footprint. Now, we can add the buffer space that makes a garage genuinely useful.
The Formula for Ample Clearance
A great RV garage isn't just a container; it's a functional workspace. You need enough room to back in without needing a spotter and a 12-point turn, open the doors without dinging them on a wall, and access every side for cleaning or repairs.
Rule of thumb: Add a minimum of 5 feet of clearance on each side for width and 5-10 feet of clearance for length. This gives you plenty of space to walk around, open storage bays, and even partially extend an awning while you're parked inside.
For height, you want to clear your RV’s highest point by at least two feet. This isn't optional; it's essential. If your rig is 13 feet tall, you need a garage door opening of at least 14 feet and an eave height of 15-16 feet to pull in and out without that heart-stopping scraping sound.
As the infographic shows, a properly sized garage is the foundation for getting the most out of your investment—from protection and property value to pure convenience.
This just drives home the point: the real benefits of an RV garage are only unlocked when the building is a perfect match for your vehicle and how you use it.
Common Sizes for Different RV Classes
While every RV is a little different, there are some pretty standard sizes that serve as a great starting point for each class. To give you a better idea, we've put together a quick reference table.
RV Class and Recommended Garage Dimensions
This table outlines the typical dimensions for different RV classes and our recommended minimum garage sizes to ensure you have enough functional space.
| RV Type | Typical RV Dimensions (L x W x H) | Recommended Garage Width | Recommended Garage Length | Recommended Eave Height |
|---|---|---|---|---|
| Class B (Camper Van) | 19'–24' L x 8' W x 9'–11' H | 12' | 30' | 12' |
| Class C Motorhome | 21'–35' L x 8.5' W x 10'–12' H | 18' | 40' | 14' |
| Class A Motorhome | 29'–45' L x 8.5' W x 12'–13.5' H | 24' | 45' | 16' |
| Fifth Wheel Trailer | 22'–40' L x 8.5' W x 12'–13.5' H | 20' | 45' | 16' |
These are just starting points, of course. Your mileage may vary depending on your specific model and needs.
If you're thinking about a larger, multi-purpose space, it's smart to look at options like 30 x 40 metal building kits. They give you more than enough room for a big rig plus a workshop, boat, or extra storage.
When in doubt, always go a little bigger. It’s far cheaper to add a few extra feet to the plan now than it is to tear down and build a whole new garage when you upgrade your RV in a few years.
Exploring Building Styles and Steel Options
Once you’ve nailed down the right size for your RV metal garage, it’s time to get into the nuts and bolts of the structure itself. This is where you’ll decide on the building’s style, its overall strength, and just how much protection it’s going to offer your investment. These choices have a huge impact on how well your garage will stand up to your local weather and how many years it will last.
Think of the roof as your garage's first line of defense. Each style handles rain, snow, and falling debris differently, which makes picking the right one for your climate a critical first step.
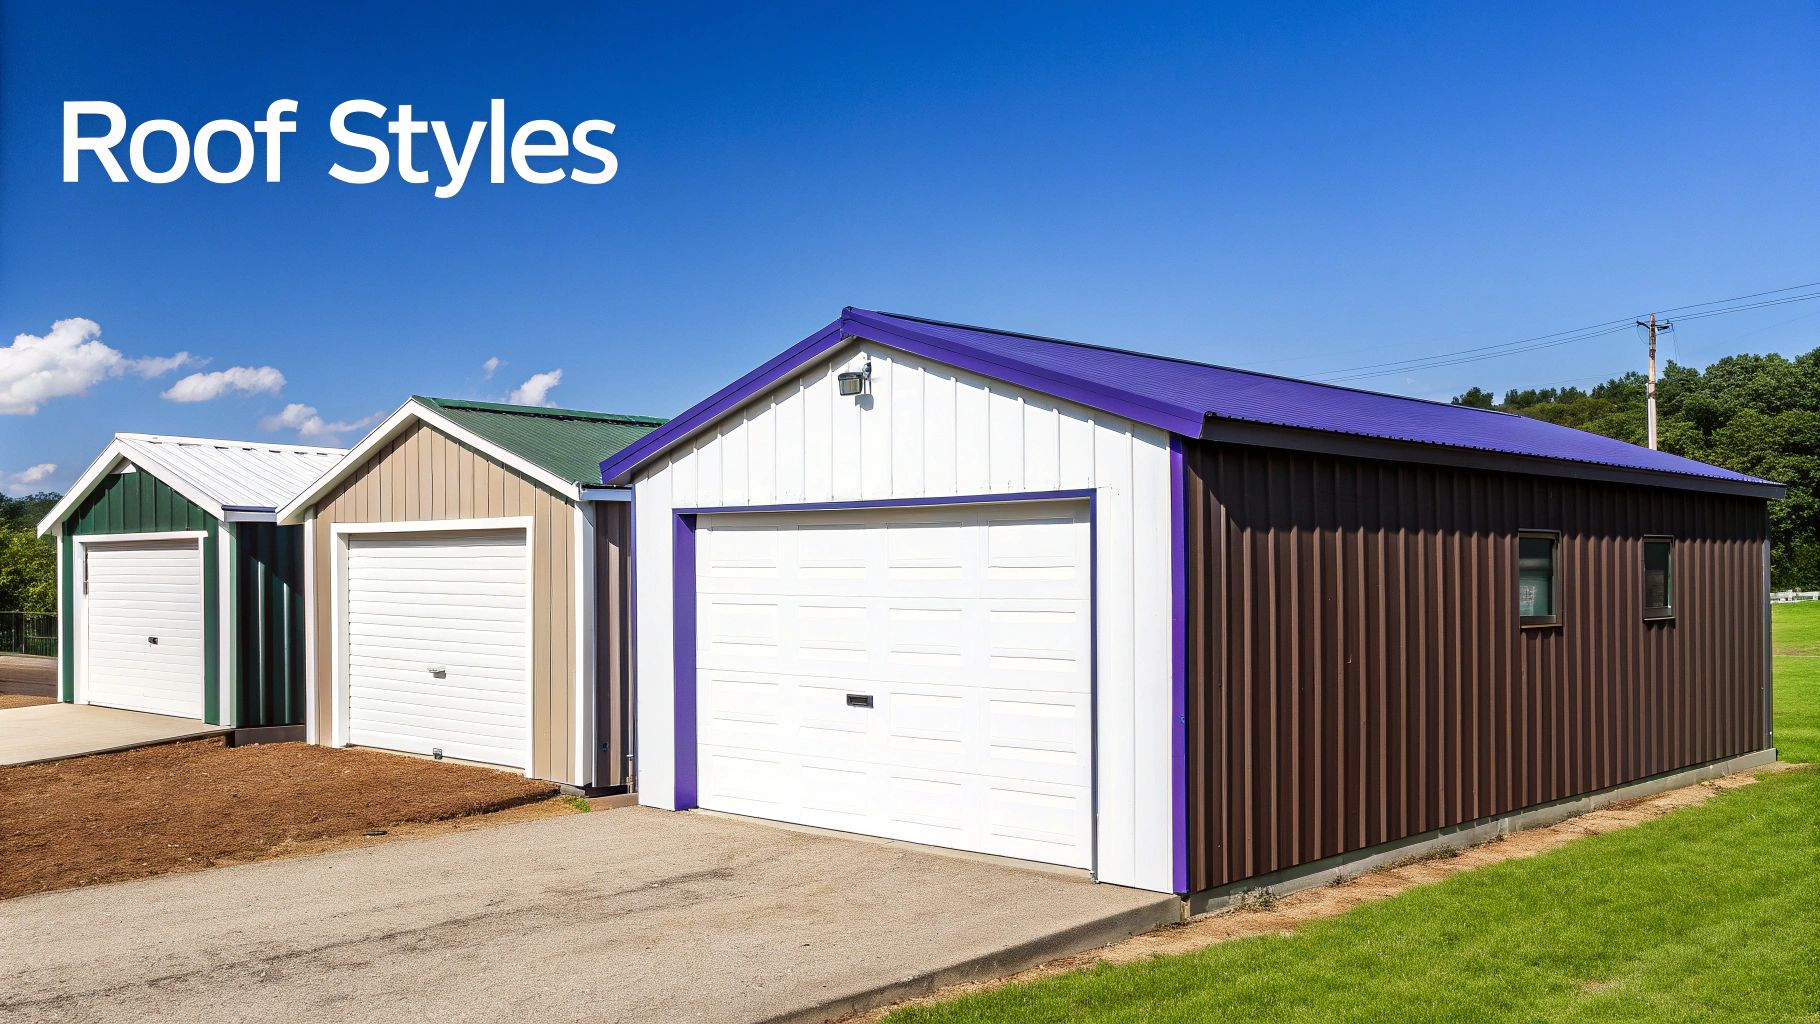
Choosing the Right Roof Style
You’ll generally find three main roof styles out there, and each one has its own set of pros and cons. Getting to know them helps you match the garage to your property perfectly.
- Regular Roof: This is your most budget-friendly option, with distinctive rounded, barn-like eaves. The roof panels run horizontally from front to back, which works just fine in areas with very little rain and no snow.
- A-Frame (Boxed-Eave) Roof: If you want a look that’s closer to a traditional house, this is it. It has a sharper roof peak and overhanging eaves, giving it a classic A-frame appearance. Just like the regular style, its panels are horizontal, which can sometimes trap leaves or water in climates with heavy rain or snow.
- Vertical Roof: This is the top-of-the-line, most durable choice. The secret is in the panel orientation—they run vertically from the peak down to the eaves. This design essentially turns your roof into a giant slide. Rain, snow, and leaves just shed right off, preventing water from pooling and cutting down on maintenance. For anywhere with heavy snowfall or frequent storms, this is the one you want.
Hands down, the vertical roof is the most popular and practical design for RV metal garages. Its superior ability to shed water and debris is key to ensuring the building stays strong for the long haul.
Understanding Steel Gauge Thickness
When you hear people talk about steel "gauge," they're referring to its thickness. Here's the slightly confusing part: a lower number means thicker, stronger steel. Your choice here is a classic trade-off between the upfront cost and the building's ruggedness.
There are two industry-standard options:
- 14-Gauge Steel: This is the go-to standard, measuring 2 ½ inches square. It's a cost-effective choice that provides plenty of strength for most applications and locations with moderate weather.
- 12-Gauge Steel: This is the premium, heavy-duty option, measuring 2 ¼ inches square. That slightly smaller dimension means the steel walls are thicker, giving it much higher tensile strength. It's the ideal pick for larger buildings or for areas that see high winds and heavy snow loads. It also typically comes with a longer warranty, which speaks to its durability.
While 14-gauge steel gets the job done for many people, upgrading to 12-gauge framing gives you extra peace of mind, especially when you're protecting something as valuable as an RV. You can dive deeper into various structure designs and learn more about the different types of steel buildings in our detailed guide.
Certified vs. Non-Certified Buildings
This is a big one. The distinction between certified and non-certified buildings directly impacts safety, durability, and whether you can even build it legally. This isn't just a matter of preference; your local building department often makes the choice for you.
A certified building has been officially engineered to meet or exceed specific local wind and snow load requirements. An engineer has put their stamp of approval on the blueprints, guaranteeing the structure can handle the weather conditions in your specific area.
Here's what that really means for you:
| Feature | Certified Building | Non-Certified Building |
|---|---|---|
| Engineering | Stamped blueprints from a licensed engineer | No engineering review or guarantee |
| Code Compliance | Designed to meet local wind & snow load ratings | May not meet local building codes |
| Permitting | Required for obtaining most building permits | Usually only works in areas with no permit laws |
| Durability | Guaranteed to handle specific weather conditions | Strength is not officially rated or guaranteed |
Bottom line: if your town or county requires a building permit for your RV garage—and most of them do—you’re going to need a certified building. It's the only way to ensure your structure is safe, compliant, and built to protect your investment for decades to come.
Custom Features That Enhance Your Garage
A basic metal shell gets the job done, but the right customizations are what turn a simple structure into a true hub for your RV lifestyle. Think of the standard frame as a blank canvas. The features you add are what really make the building work for you, boosting convenience, comfort, and usability day-to-day.
From the massive doors you drive through to the windows that let the light in, every single option plays a critical role.
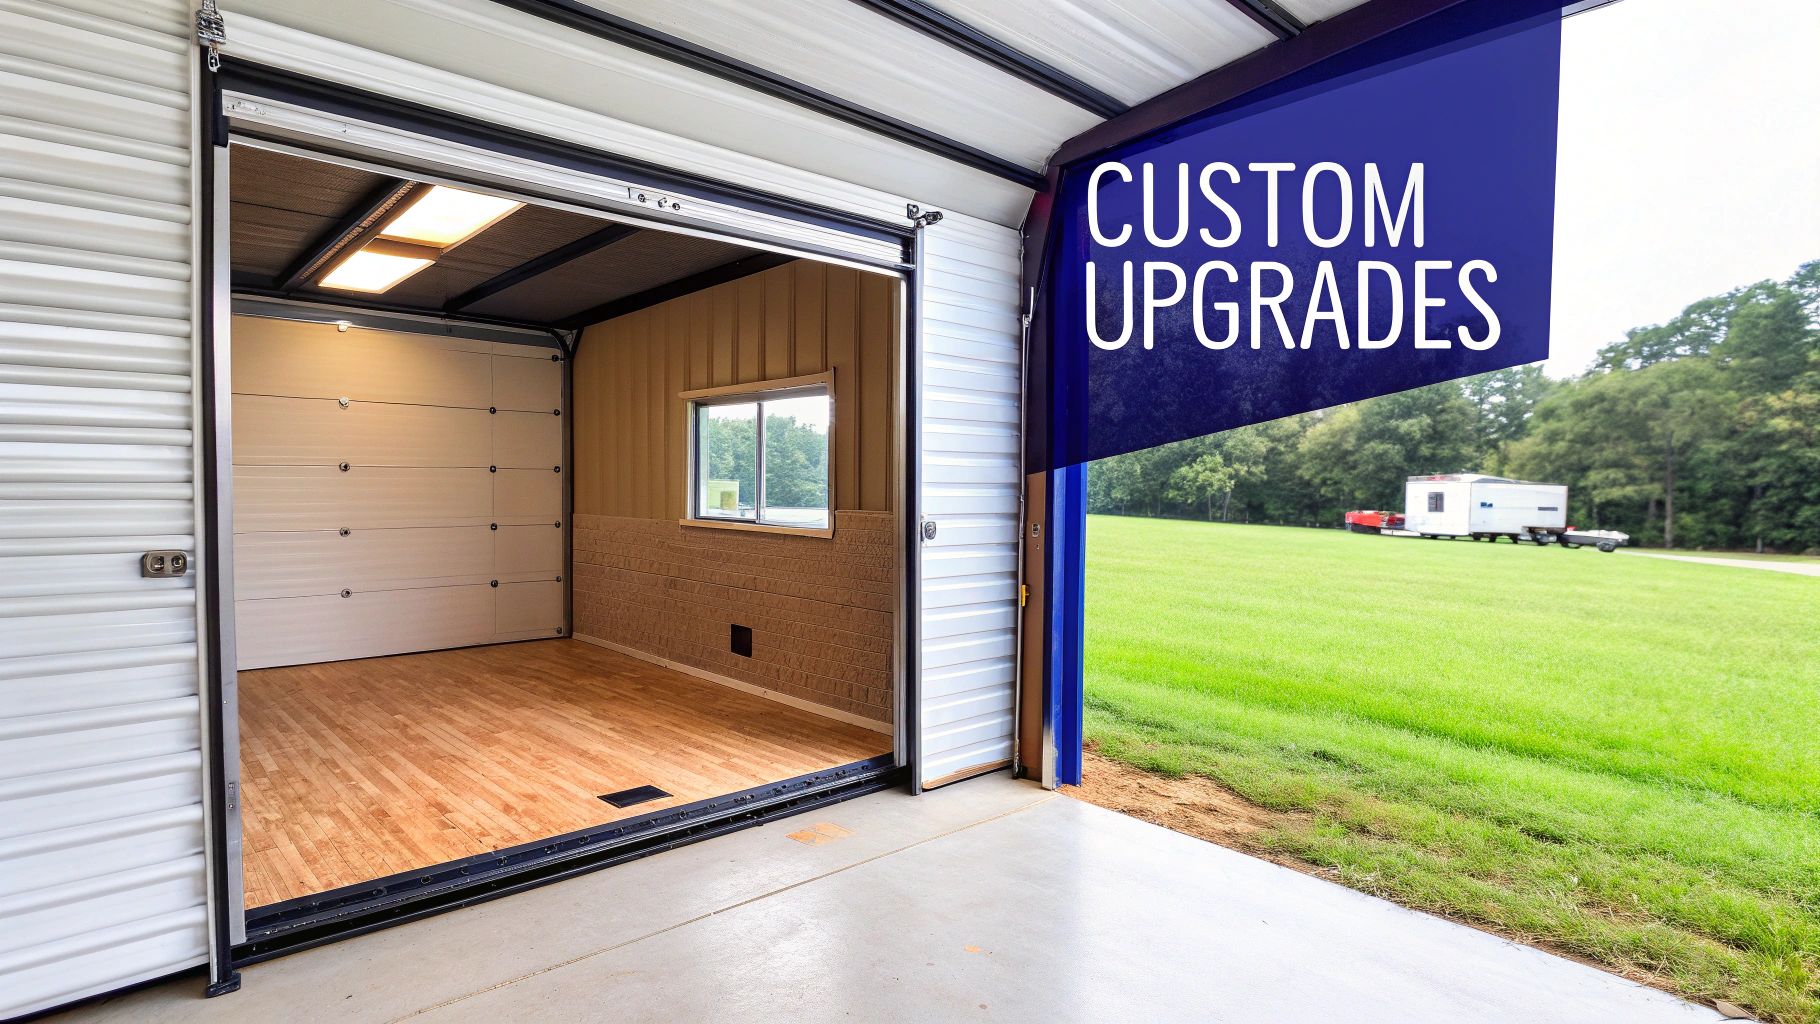
These upgrades take your RV metal garage from just a parking spot to a practical, multi-use space. By choosing the right components, you can create a building that’s not just for storage but also for maintenance projects and even a little outdoor relaxation.
Essential Entry and Access Options
Your garage doors are probably the most important functional decision you’ll make. For an RV, this is a huge deal—it directly impacts how easily you can get your rig in and out. The two main options each have their own clear advantages.
- Roll-Up Doors: These are the absolute workhorses of the metal building world. They coil up neatly into a drum right above the opening, so they don’t need any interior ceiling tracks. This design is tough, cost-effective, and gives you the maximum possible vertical clearance inside. Perfect for those tall RVs.
- Overhead Sectional Doors: You'll recognize these—they're the same style of doors found on most residential homes. They run on tracks along the ceiling, which gives you a better seal and more insulation. While they offer a more finished, traditional look, just remember those tracks will eat up a little bit of your interior overhead space.
Beyond the main entrance, adding a walk-in door is a non-negotiable convenience. Trust me, you'll thank yourself later. It saves you from having to hoist that massive garage door every time you just need to pop in and grab a tool.
Upgrades for Comfort and Functionality
Making your garage a comfortable and well-lit space is key, especially if you plan on doing any work in there. Windows are a fantastic addition, letting natural light flood the interior. This cuts down on the need for constant electrical lighting and just makes the space feel more pleasant to be in. Standard sizes like 24"x36" are easy to pop into any wall panel.
Insulation is another feature that completely changes the game. It transforms your garage from a metal box that just mimics the outside temperature into a space with a stable, comfortable climate.
An insulated garage doesn't just protect your RV from extreme heat and cold; it also significantly reduces condensation. This moisture control is vital for preventing rust on your tools and inhibiting mold or mildew growth inside your motorhome.
Proper ventilation, like ridge vents or gable vents, works hand-in-hand with insulation to keep the air moving. This simple add-on helps push hot air out in the summer and damp air out in the winter, preserving both the building and everything you store inside.
Expanding Your Garage's Footprint
Sometimes, the most useful features are actually on the outside of the main structure. A lean-to is a single-slope roof extension that you add to the side of your RV metal garage. It’s a dead-simple, highly cost-effective way to create more covered space without having to put up an entirely new building.
A lean-to is incredibly versatile. You could use it as:
- A covered patio for some outdoor chairs.
- A carport for your daily driver.
- Protected storage for a boat, lawnmower, or four-wheeler.
This addition effectively multiplies your usable square footage, turning one building into a multi-purpose workhorse. When you combine smart interior features with practical exterior additions like a lean-to, you can design an RV metal garage that truly serves every possible need.
Navigating Costs, Permits, and Site Prep
Once you’ve settled on the perfect size and style for your RV garage, it’s time to shift your focus from the design to the groundwork. The steps you take before your building ever arrives are just as crucial as the structure itself. This phase really boils down to three connected parts: getting a handle on the total cost, securing the necessary permits, and preparing your land for a solid foundation.
Think of this part of the process as building a sturdy launchpad. A clear, honest budget prevents nasty financial surprises down the road. Proper permits make sure your project is legal and up to code. And a perfectly prepped site guarantees your garage will stand strong for decades. Nailing these three things from the start is the secret to a smooth, headache-free installation day.
Unpacking the Total Cost of RV Metal Garages
The sticker price you see on a metal garage is just one piece of the financial puzzle. To put together a realistic budget, you absolutely have to account for all the other expenses that add up. These can swing wildly depending on your location, how complex your build is, and the specific features you’ve chosen. A great place to start is exploring a detailed breakdown of metal garage costs to see how all the different factors come into play.
Broader economic forces can also move the needle on pricing. For example, the steel market has seen some big shifts lately. Thanks to renewed steel tariffs, metal building prices have jumped by roughly 8% to 15%. A 40×60 building—a popular size for larger RVs—that used to run between $28,000 and $45,000 might now be in the neighborhood of $30,000 to $51,750. Staying informed about these market changes helps you set realistic expectations.
The Permit Process Demystified
Before a single shovel hits the dirt, you have to tackle the world of building permits. This isn't an optional step. Skipping it can lead to massive fines or even a tear-down order for your brand-new garage. The whole point of the permit process is simply to ensure your structure is safe and complies with local zoning laws and building codes.
The first move is to contact your local building or planning department. They'll give you a checklist of everything you need, which usually includes:
- Engineered Blueprints: For any certified building, these plans are proof that the structure is designed to handle your area's specific wind and snow loads.
- Site Plan: This is just a simple map of your property showing where the garage will go, including its distance from property lines and other buildings.
- Foundation Plans: These are the details on the type and specs of the foundation you intend to build.
Don’t look at the permit office as an obstacle. Think of them as a partner in safety. Their job is to make sure your investment is built to last and won't pose a risk to you or your neighbors.
Preparing the Perfect Foundation
Your RV metal garage is only as strong as the ground it sits on. A perfectly level and stable site isn’t just a nice-to-have; it's absolutely essential for a successful installation. If the foundation is off, the garage panels won’t align correctly, doors can jam, and the whole structure could settle unevenly over time. That leads to serious problems.
You’ve got a few options for the foundation, each with its own set of trade-offs.
Site Preparation and Foundation Comparison
Choosing the right foundation is a critical decision that balances cost, longevity, and your specific needs. Here's a look at the most common options.
| Foundation Type | Estimated Cost per Sq. Ft. | Pros | Cons |
|---|---|---|---|
| Concrete Slab | $6 – $12 | Most durable, permanent, provides a clean floor | Highest upfront cost, requires professional installation |
| Asphalt Pad | $4 – $9 | Less expensive than concrete, durable | Can soften in extreme heat, less permanent than concrete |
| Gravel Pad | $2 – $5 | Most affordable, excellent drainage | Can be messy, requires regular maintenance to stay level |
For a building as large and heavy as an RV garage, a concrete slab is overwhelmingly the best choice. It offers stability and longevity that other options just can't match. Knowing how to approach accurately calculating concrete volume is a key skill here, ensuring you pour a foundation that’s built to the right specs from day one.
Simple Maintenance for Long-Term Durability
One of the best things about choosing an RV metal garage is just how little maintenance they need. Forget the constant painting, sealing, and pest control that come with wood structures; a steel building pretty much takes care of itself. Still, a little proactive care goes a long way toward making sure your investment lasts for decades.
Think of it as a quick seasonal health checkup for your garage. A few simple tasks performed once or twice a year can stop small issues from turning into big headaches, guaranteeing your building stays strong and looks great. This small amount of effort is all it takes to keep your garage resilient for the long haul.
Your Seasonal Maintenance Checklist
A simple, seasonal routine is the easiest way to stay on top of maintenance. Most of these jobs take almost no time but pay off big time in longevity.
- Wash the Panels: At least once a year, give the walls and roof a gentle wash with mild soap and water. This gets rid of the dirt, pollen, and grime that can build up and stain the finish over time.
- Clear Gutters and Roof: Always remove leaves, twigs, and other junk from your roof and gutters, especially after a storm. Clogged gutters are a big problem because they let water back up and sit against the roof panels.
- Check Fasteners: Do a quick walk-around inside and out to visually inspect the screws and bolts. If you see any that look loose, just snug them up with a wrench to keep everything tight and secure.
Pro Tip: After a major weather event like a high-wind storm or a heavy snowfall, it’s always a good idea to do a quick visual inspection. Check for any signs of damage, make sure all the panels are secure, and confirm the structure is still firmly anchored.
Addressing Minor Issues Promptly
Even the toughest steel can get scratched. If a tool, a flying rock, or a stray branch puts a deep scratch in the panel’s protective coating, you’ll want to fix it quickly to prevent rust from getting a foothold. Just clean the spot and apply a little touch-up paint from the manufacturer to reseal the steel from moisture.
Knowing how to spot and handle common issues is key to durability. You can learn more by reading about solving corrugated metal roof problems from industry experts, which will help you identify potential concerns before they escalate.
For a more structured game plan, our comprehensive commercial building maintenance checklist offers detailed insights that work for any large steel structure. Follow these simple steps, and your RV metal garage will remain a durable, reliable, and attractive asset on your property for years to come.
Answering Your Final Questions About RV Metal Garages
As you get ready to pull the trigger, a few last-minute questions always seem to pop up. We get it—this is a big decision. Let’s tackle some of the most common questions we hear from homeowners, so you can move forward feeling completely confident.
Can I Just Install an RV Metal Garage Myself to Save Some Cash?
While it might be tempting to go the DIY route, especially if you're handy, we almost always advise against it for a structure this big. Think of it this way: smaller carports are like furniture kits from IKEA, but a full-sized RV metal garage is more like building an actual house addition.
Their sheer size, height, and the weight of the steel components require special equipment and a crew that knows exactly how to align everything for maximum structural integrity. Attempting it yourself isn't just risky; it could also void your warranty or cause you to fail a local building inspection. Besides, professional installation is often rolled into the purchase price, ensuring the job is done right, safely, and to code.
How Long Does It Actually Take to Get My Garage Installed?
The total time from "I want one" to "It's finished" has a few moving parts. Once you’ve finalized your design and placed the order, manufacturing your custom garage components usually takes about 2 to 6 weeks.
The real wildcard in the timeline is getting your local building permits approved. Depending on how busy your municipality is, this can take anywhere from a few weeks to a couple of months. The good news? Once the permits are in hand and your site is prepped and ready, the on-site build is incredibly fast. A professional crew can typically have the entire structure up in just 1 to 3 days.
Remember, the longest part of this journey is almost always the site prep and permitting. The actual construction of your RV garage is the quick, exciting part where you see it all come together.
Are Metal Garages Really Loud When It Rains?
This is a classic concern, and a valid one. An uninsulated metal building will definitely be louder in a downpour than a house with a traditional shingled roof. But nobody wants to feel like they’re inside a drum during a storm, and you don’t have to.
The fix is simple: insulation. Adding an insulation package—whether it's spray foam or a vapor barrier with fiberglass batting—is a game-changer. It doesn’t just regulate the temperature inside your garage; it acts as a fantastic sound buffer. With proper insulation, the roar of rain and wind is softened to a much more pleasant, gentle hum.
Do I Absolutely Need a Concrete Foundation for My Garage?
For a major investment like an RV, a concrete slab foundation is the gold standard, and it's what we recommend every time. It gives you a perfectly level, durable, and stable base that you can anchor the building to securely. Plus, it creates a clean, permanent floor that keeps moisture from the ground from seeping in.
Are there other options? Sometimes. Depending on local codes and the building's size, a properly compacted and leveled gravel pad might be permissible. But if you’re looking for the best long-term stability and protection for both your RV and the building itself, nothing beats a concrete foundation for RV metal garages.
Ready to design the perfect, long-lasting home for your RV? The experts at Icon Steel Buildings can help you configure a custom metal garage that meets your exact needs and local requirements. Explore your options and get a free quote today.