
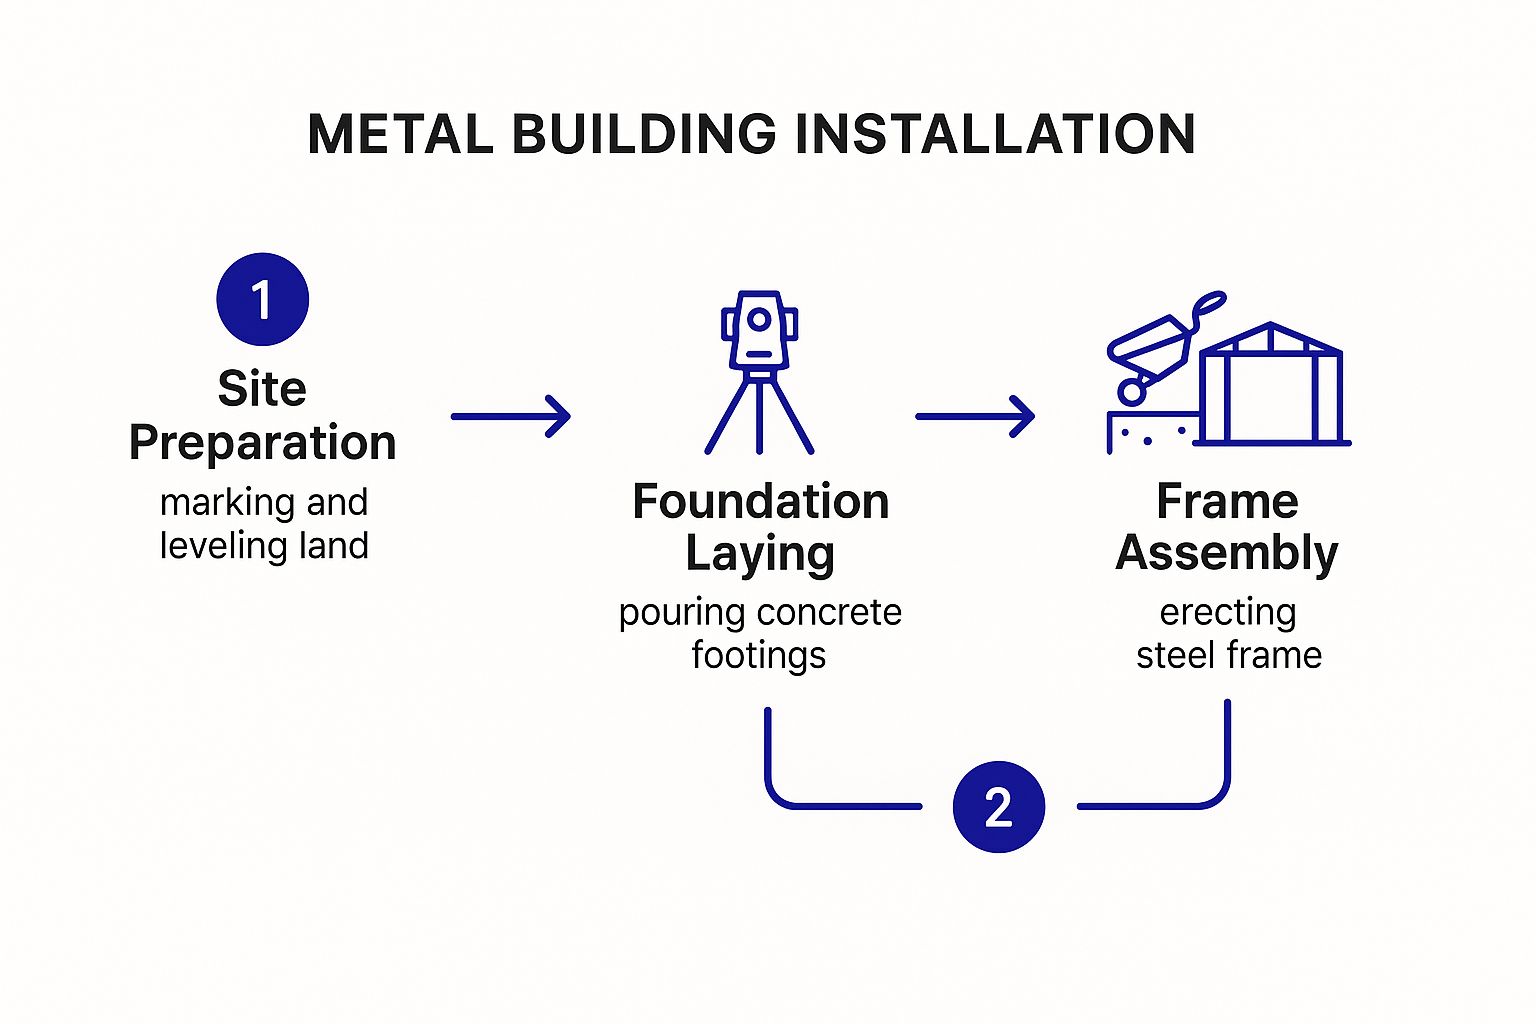
A successful metal building project is all about what happens before the first steel beam ever goes up. We're talking about meticulous site preparation and pouring a solid foundation—these are the two most critical factors that determine your building's stability and durability for the long haul.
Get the foundation right, and you prevent a world of future structural headaches, ensuring your investment stands strong for decades.
Laying the Groundwork for Your Metal Building
Before any steel components even show up on your property, all the focus is on that patch of land where your structure will live. Getting this phase right isn't just a suggestion; it's non-negotiable for a smooth project.
Think of the foundation as the anchor for your entire investment. Cutting corners here is a surefire way to create expensive problems down the road. This isn't just about clearing some dirt; it’s about careful planning and precise execution to create a base that’s stable, level, and totally reliable.
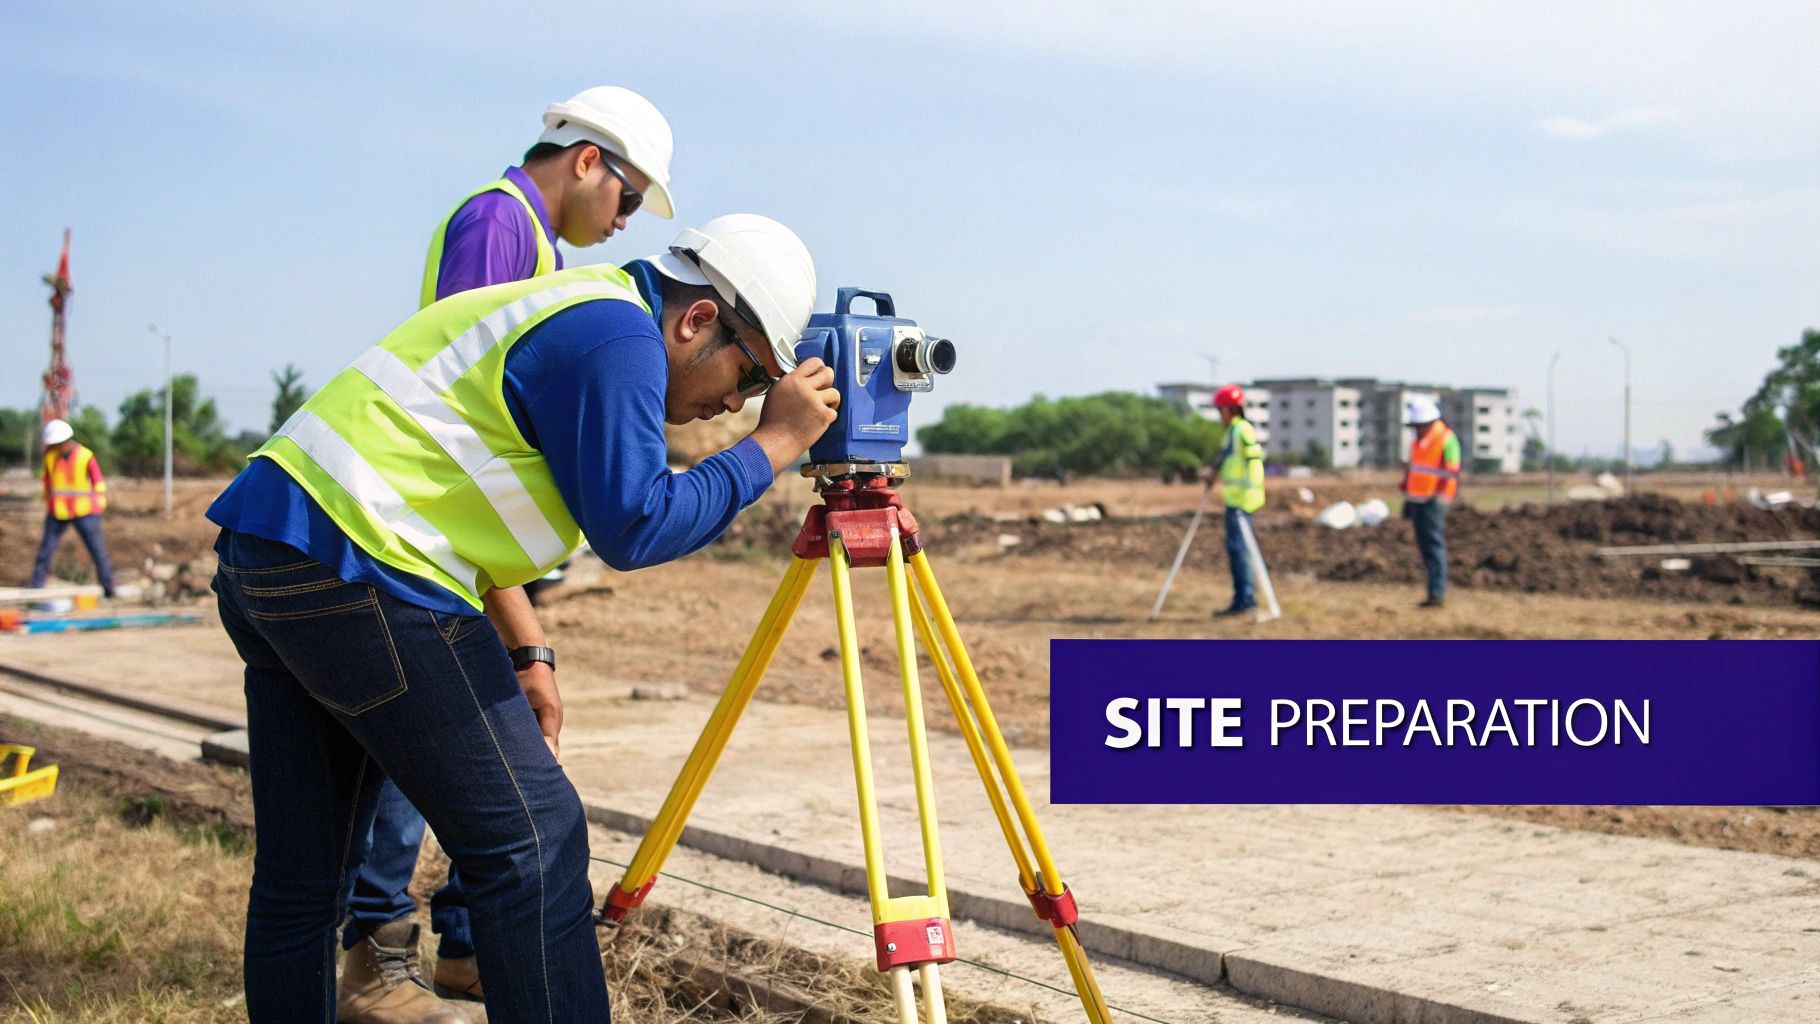
Site Preparation and Grading
First things first, you need to pick the best spot on your property. You have to think ahead about access for vehicles and equipment, but also look at the natural drainage. You absolutely want to avoid any low-lying areas where water could pool around your foundation.
Once you’ve pinpointed the location, the site has to be graded. This means leveling the ground to create a perfectly flat pad for the building. Proper grading is what makes rainwater flow away from the structure, protecting the foundation from water damage and soil erosion. A poorly graded site can lead to shifting, settling, and uneven stress on the building's frame.
A common mistake I see is people assuming "mostly flat" is good enough. It's not. Even a tiny, almost invisible slope can funnel water right toward your foundation, slowly destroying its integrity. Take the extra time to get a perfectly level and compacted base. You'll thank yourself later.
Choosing the Right Foundation
With a properly prepped site, your next big decision is the type of foundation. What you choose will depend on your building's size, what you plan to use it for, and the soil conditions in your area.
This whole process is a sequence. You can't have a solid frame without a perfect foundation, and you can't have a perfect foundation without a properly prepared site. Each step builds on the last.
Here's a look at the two most common foundation types we work with:
- Concrete Slab: This is a single, thick layer of concrete poured across the building's entire footprint. It's the go-to for workshops, garages, and commercial buildings where you need a tough, level floor.
- Pier Foundation: Instead of a single slab, this foundation uses individual concrete piers or columns set deep into the ground. It's a great solution for uneven terrain or for structures like barns or carports that don't need a continuous concrete floor.
Foundation Options for Metal Buildings
Choosing the right foundation can feel overwhelming, but it boils down to your specific needs. This table breaks down the most common options to help you compare them at a glance.
| Foundation Type | Best For | Pros | Cons |
|---|---|---|---|
| Monolithic Slab | Garages, workshops, retail spaces, smaller buildings on level ground. | Cost-effective, fast installation (single pour), provides a finished floor. | Not ideal for sloped lots or areas with poor soil stability. |
| Stem Wall | Larger buildings, sites with a slight slope, areas with frost heave. | Very strong and stable, elevates the structure off the ground. | More expensive and time-consuming than a monolithic slab. |
| Pier Foundation | Carports, barns, agricultural buildings, and structures on steep slopes. | Excellent for uneven terrain, minimal site disturbance, cost-effective. | Does not provide a finished floor, less suitable for enclosed buildings. |
| Floating Slab | Sheds, small storage buildings where soil movement is a concern. | Adapts to soil shifts, simpler to install than traditional foundations. | Not suitable for heavy-duty commercial or large residential buildings. |
Ultimately, the best choice depends on a combination of your building’s purpose, your site’s geography, and your budget.
Understanding your local building codes and the specific requirements for your structure is crucial. For a closer look at professional foundation work, you can find more details on our https://iconsteelbuildings.com/concrete-service-and-service-area/.
To get a solid financial roadmap for your project, using a reliable tool for construction cost estimation can give you much-needed clarity right from the start. This kind of planning is more important than ever, especially with construction starts expected to climb by 9% in 2025 due to a strengthening economy.
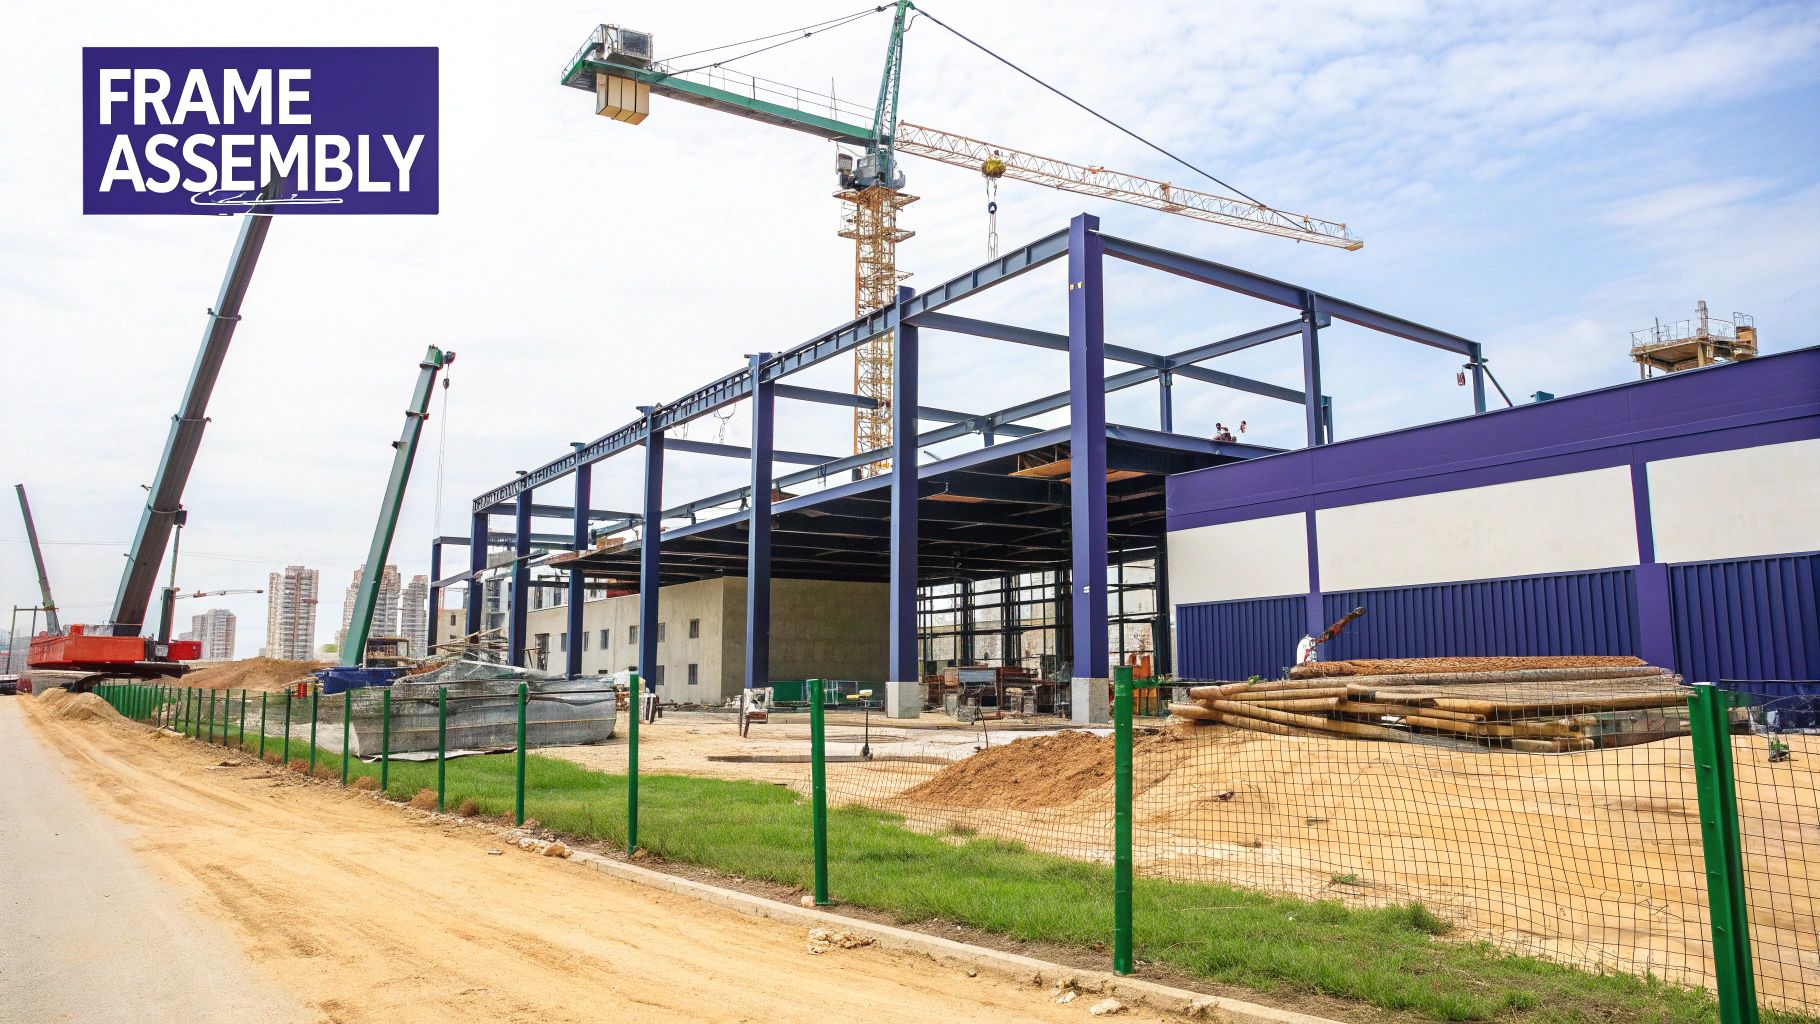
Raising the Primary Steel Framework
This is the moment it all starts to feel real. Your project goes from being a flat concrete slab to a three-dimensional structure. Honestly, erecting the primary steel framework is the most exciting part of any metal building installation. With the foundation ready and waiting, you can finally get to work assembling the heavy-duty I-beams that form the skeleton of your new building.
Success at this stage is all about being organized and methodical. Before you even think about lifting a single piece of steel, lay out all your columns and rafters exactly where they’re supposed to go, according to your construction plans. Every component will have a specific part number that matches the drawings. Taking the time to sort and stage everything now will save you from a massive headache later on.
Decoding Your Construction Plans
Think of your blueprints as the roadmap for the entire assembly. They can look intimidating, but they’re designed to be read logically. The section you're looking for is usually labeled "erection drawings" or "framing plans," which gives you a bird's-eye view of the whole structure.
These plans show you exactly which column goes on which anchor bolt pattern and which rafter connects to it. Pay close attention to the details here:
- Part Numbers: Every single beam is labeled. Your job is to match the number on the steel to the corresponding number on your plans.
- Connection Points: The drawings clearly illustrate how different pieces join together. They'll even specify the type and number of bolts needed for each connection.
- Bay Spacing: Your plans will tell you the precise distance between each frame line. Getting this right is critical to keeping the building perfectly square.
Spending a solid half-hour studying these plans with your crew before you start can prevent countless hours of frustrating rework.
The Critical First Bay
The very first bay you put up sets the standard for the entire building. If it’s not perfectly plumb (that’s vertically level) and square, every single bay that follows will be off. This creates a domino effect of problems that you won’t discover until you’re trying to install the secondary framing and wall panels.
This is where bracing is absolutely essential. Once the first two frames are standing, you have to install temporary bracing—usually steel cables or rigid rods—to lock them in position. Use a level on the columns, and then measure diagonally across the bay from corner to corner. When those two diagonal measurements are identical, you know your bay is square.
Securing that first bay properly is non-negotiable. I’ve seen crews rush this step, only to waste days trying to force panels to fit on a crooked frame. Lock down that first section with temporary bracing, and don't even think about removing it until the secondary framing is installed to provide permanent stability.
Lifting and Securing the Frame
For most pre-engineered buildings, you're going to need some mechanical muscle to lift the heavy steel. A forklift with a boom attachment or a small crane is what we typically see on site. Safety here is paramount. Make sure everyone on the ground maintains a safe distance and wears the right personal protective equipment (PPE), like hard hats and steel-toed boots. If you want a deeper dive into the components you’ll be working with, you can learn more about the different parts of a metal building frame.
When you’re connecting a rafter to a column, just loosely tighten the bolts at first. This gives you a little wiggle room to make minor adjustments and get everything perfectly aligned. Once you’ve confirmed the frame is plumb and square, go back and torque every single bolt to the exact specifications listed in your engineering plans. That final step is what guarantees the structural integrity of your building's primary framework.
Adding Secondary Framing for Strength and Support
With your primary frame standing tall, the skeleton of your building is officially in place. Now it’s time to flesh it out with the secondary framing—the girts on the walls and the purlins on the roof. These pieces are the unsung heroes of a successful metal building installation, adding the critical lateral support your structure needs to handle serious wind and snow loads.
Think of girts and purlins as the connective tissue linking your main steel framework. They do the heavy lifting of distributing stress across the entire structure, and they also create the mounting surface you'll need for attaching wall and roof panels. Trying to cut corners here by skipping pieces or spacing them incorrectly is a massive mistake that can seriously compromise your building's integrity down the road.
Interpreting Plans for Girt and Purlin Placement
Your construction blueprints are your bible for this phase. They’ll spell out the exact on-center spacing for every single girt and purlin. This isn't just a suggestion; it’s a precise measurement calculated by engineers to meet your local building codes and load requirements. Following these plans to the letter is non-negotiable for structural safety.
For instance, if you're building in an area known for heavy snowfall, you'll see purlins spaced much closer together than you would for a building in a warmer, drier climate. The same goes for girts in regions prone to high winds—closer spacing means more strength.
Installing Bracing for Rigidity
Beyond the girts and purlins, your building also needs bracing to keep it from racking or swaying under pressure. This is where components like tension cables and portal frames enter the picture. You'll install these diagonally within specific bays to lock everything together into a rigid, unmovable structure.
A common mistake I see on job sites is failing to properly tension the bracing cables. If the cables are left too loose, they're not providing any real support. But if you overtighten them, you can actually pull the main frame out of plumb. You're aiming for a Goldilocks level of tautness—just enough to eliminate slack without distorting the steel columns or rafters.
Properly torquing every bolt to the exact specifications in your engineering plans is the final, crucial step to guaranteeing maximum strength. This isn't a task for a "good enough" approach; you absolutely need a calibrated torque wrench to get it right.
The cost of these essential steel components can shift based on market dynamics. A few years ago, when U.S. government tariffs were introduced, we saw hot-rolled coil steel prices jump from a low of $650 per ton to nearly $900 per ton. That economic reality has pushed the industry toward smarter, pre-engineered building systems that help control costs and dramatically speed up installation. You can read more about steel market trends on tylerbuilding.com.
The level of personalization available today is incredible. You can explore a huge variety of custom steel buildings designed from the ground up to meet specific looks and functions, all while making sure these critical structural elements are perfectly integrated from day one. This modern approach ensures your building isn't just functional, but also engineered for a lifetime of durability.
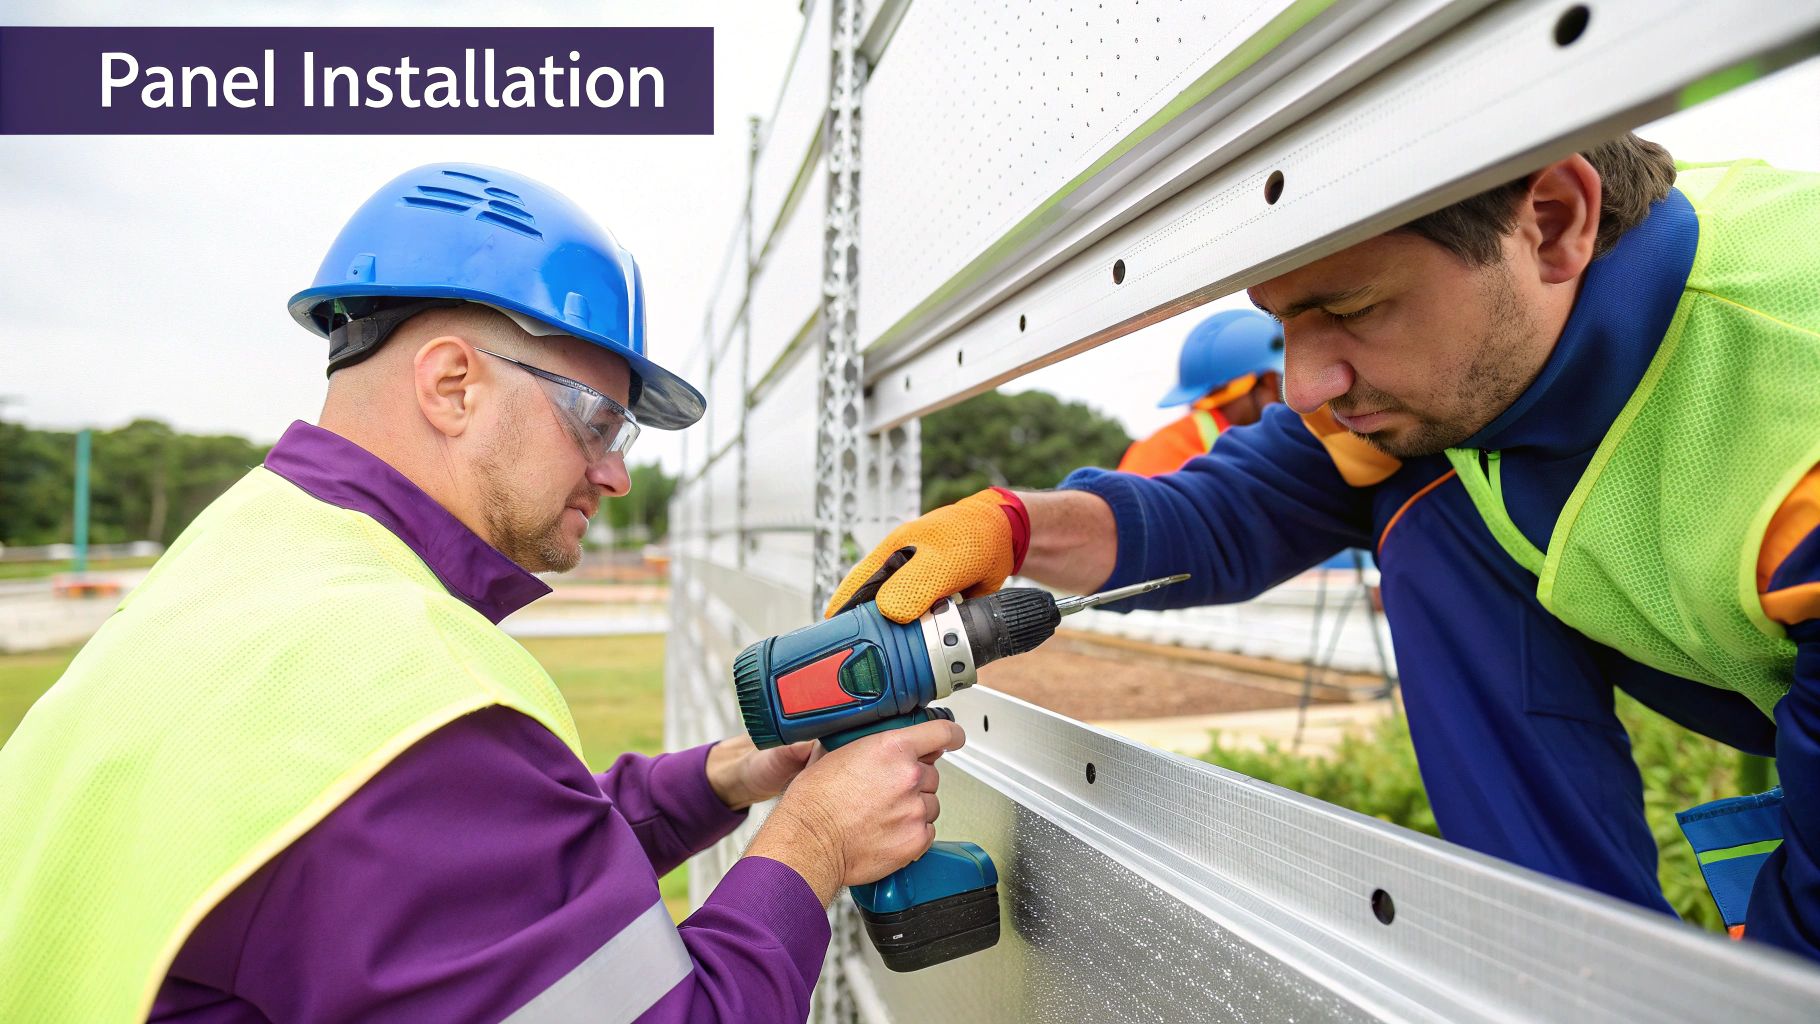
Sheeting the Walls and Roof for a Weathertight Seal
Once the secondary framing is locked in, your structure is finally ready for its skin. Attaching the wall and roof panels is the moment the steel skeleton really starts to look like a building. This stage is all about creating a tough, weathertight envelope that will protect everything inside from the elements for years to come.
This isn't a race to the finish line. It's a methodical process where precision is everything. Getting it right prevents leaks, drafts, and ugly alignment issues that can become a permanent headache.
The All-Important First Panel
The very first wall panel you hang is, without a doubt, the most important one. Its placement sets the precedent for every single panel that follows on that wall.
You have to take your time here. Make sure this initial panel is perfectly plumb (that’s vertically level) and square to the frame before you even think about driving a screw. If it’s off by even a tiny fraction, that error will multiply with each panel you add, leaving you with crooked lines and a finish that just looks wrong.
I’ve seen crews spend an entire day redoing a wall because they rushed the first panel. Check it with a level, measure from the corner, and double-check it again. A few extra minutes here saves countless hours of rework and guarantees a clean, straight sightline down the length of your building.
Once that first panel is perfectly positioned, the rest of the wall becomes a much smoother process. You’ll just work your way down the building, overlapping each new panel exactly as the manufacturer specifies.
Fastening Panels the Right Way
Securing the panels involves a lot more than just driving screws. Your technique here directly impacts how waterproof your building will be.
- Sealant Application: Before you overlap the panels, run a bead of butyl tape or sealant along the edge. This creates a flexible, waterproof gasket that stops moisture from ever finding its way into the seam.
- Screw Placement: Drive your fasteners through the high ribs on the roof panels. For wall panels, it’s usually in the flats—but always, always check your plans for the correct pattern.
- Proper Torque: Don't crank down on the screws. The idea is to compress the little neoprene washer just enough to create a seal without crushing or distorting it. An over-tightened washer is just a future leak waiting to happen.
Choosing Your Sheeting System
Not all panel systems go on the same way. The two most common types you’ll run into have their own installation methods and benefits.
- Screw-Down Panels: You’ll also hear these called through-fastened panels. They attach directly to the girts and purlins with exposed fasteners. They are cost-effective and pretty straightforward to install, which makes them a popular choice for a ton of different applications.
- Standing Seam Roofs: This is the premium option. It uses concealed clips to attach the panels to the roof purlins. The panel seams are then mechanically locked together, creating an incredibly durable and weathertight roof with zero exposed screws.
The system you choose will likely come down to budget, what you want the building to look like, and how you plan to use it.
For anyone weighing their options, our ultimate guide to steel building kits is a great resource. It gives a solid overview of what's out there for different projects and helps you pick a system that delivers both the look and the long-term performance you need.
Installing Trim, Doors, and Final Details
With the main structure up and the wall panels in place, it’s time for the finishing touches. This is the phase where your project transforms from a functional shell into a polished, professional-looking building. We're talking trim, doors, and water management systems—the details that provide critical protection against weather, pests, and moisture.
Don't rush this part. These final steps are what tie everything together, and getting them right prevents future headaches like leaks, drafts, or just an unfinished look that can undermine all your hard work.
Attaching Trim for a Polished Seal
Trim is the secret weapon for a clean, weathertight finish. Every piece has a specific job, whether it’s sealing up corners or protecting the roofline from the elements. You'll be working with a few key types.
- Corner Trim: This covers the vertical seams where wall panels meet. It creates a sharp, clean line while blocking out wind and rain.
- Eave Trim: You'll install this along the roof's edge where it meets the walls. Its main job is to direct water away from the wall panels and, ideally, right into your gutters.
- Gable Trim: This piece finishes off the sloped edges of the roof, giving it a complete look and protecting the structure underneath.
A crucial tip from the field: always apply butyl tape sealant behind the trim before you fasten it down. This simple step creates a waterproof gasket that stops water from wicking its way behind the metal—a common source of hidden, slow-developing leaks.
Installing Doors and Framed Openings
A building isn't much use without a way in. Whether you're adding a simple walk-in door or a massive roll-up door, the process always starts with a perfectly square framed opening.
For walk doors, you'll typically build a sub-frame inside the opening that the door and its jamb can mount to. For big roll-up doors, the tracks are usually mounted directly to the building's structural steel. Precision here is non-negotiable. If an opening is even slightly out of square, the door will bind, stick, or fail to seal properly.
As you plan these final touches, it's smart to think about the cost considerations for garage door installation. Properly sealing around these openings with quality weatherstripping and caulk is essential to prevent energy loss and water intrusion. Choosing your doors and other add-ons early in the design phase is a great way to ensure a perfect fit. You can explore a variety of metal building accessories to find components that match your project's needs perfectly.
The demand for durable, efficient buildings is on the rise. In fact, the global metal building systems market is projected to hit USD 22.5 billion by 2025. This growth is largely driven by the need for weather-resistant components like high-quality metal roofing and trim that ensure long-term performance.
Common Metal Building Installation Questions
Even the most detailed blueprint can't cover everything. When you're in the middle of a metal building installation, questions are guaranteed to come up. Getting ahead of the most common ones will save you a ton of stress and keep your project moving smoothly. Let's walk through some of the questions we get asked all the time.
What Equipment Is Absolutely Necessary?
The machinery you'll need is directly tied to the scale of your building. For a small, garage-sized kit, you might be able to pull it off with some basic hand tools, good ladders, and maybe a scaffold. But let's be realistic—for most projects, you'll want some heavy-duty help to handle the lifting safely and efficiently.
- Scissor Lift or Man Lift: This is a non-negotiable for safely reaching high spots when you're setting purlins, laying roof panels, or putting up trim. Trying to do that kind of work from the top of a ladder is not only slow but incredibly risky.
- Forklift with Boom Attachment: This will be the workhorse on your job site. You'll use it for everything from unloading the steel components off the truck to hoisting heavy I-beams into place and positioning frame sections for bolting.
A word of advice: don't try to pinch pennies by manually lifting heavy framework. I’ve seen that movie before, and it often ends with injuries or damaged steel. Renting the right lift for a couple of days is a small price to pay for safety and speed.
How Long Does Installation Usually Take?
This is the classic "it depends" question, but I can give you a solid ballpark. The great thing about pre-engineered steel buildings is how fast they go up compared to traditional construction. Once your foundation is fully cured and ready for action, a small crew can often get the main frame erected in just a few days.
As a general rule, a standard 30×40 shop could take a two-person team about 5-7 days to fully frame, sheet, and trim out. On the other hand, a large-scale commercial building with complex features might take several weeks. The timeline really hinges on a few key things:
- Crew Size and Experience: A seasoned crew that's done this a dozen times will fly through the process compared to a couple of DIY first-timers.
- Weather Conditions: You can't fight Mother Nature. High winds or a week of heavy rain will shut down operations, especially when you're working with large roof panels.
- Building Complexity: A simple, rectangular box goes up fast. Start adding multiple lean-tos, varied roof pitches, or custom openings, and you're naturally going to add time to the project.
Can I Modify or Expand My Building Later?
Absolutely. This is honestly one of the biggest perks of going with a pre-engineered steel building. The modular nature of the design makes future expansions surprisingly straightforward. The most common modification we see is adding more bays to extend the length of the building, which is also the easiest to do.
To pull off an expansion, you'll need to remove the sheeting and framing from one of the end walls, pour an extension for your foundation, and then add new primary frames, purlins, girts, and panels that match the original structure.
Here's a pro tip: If you even think you might want to expand down the road, mention it during the initial design phase. Your engineer can design that end wall as a "rigid frame" from the get-go, which makes tying in the new addition later a much simpler process.
Ready to build a structure designed for durability and future flexibility? The team at Icon Steel Buildings is here to guide you through every step, from initial design to final installation. Explore your options at https://iconsteelbuildings.com.
Article created using Outrank