
A successful steel building project is won or lost long before the first beam is raised. It all comes down to the plan. The quality of your prep work has a direct impact on the efficiency, cost, and final outcome of the entire build. This is where you lay the groundwork for everything that follows.
Your Blueprint for a Successful Installation
Kicking off a new build is exciting, but jumping in without a solid roadmap is a recipe for headaches and blown budgets. From my experience, the biggest problems don’t come from the physical construction itself; they come from overlooked details in the planning stage. A smart, methodical approach is what separates a smooth project from a stressful one.
This is your chance to ask the hard questions, gather the right info, and set yourself up for success.
Navigating Codes and Site Selection
The first real step is picking a location and getting to know its unique rules. Don't brush this off—a bad site choice can tack on huge, unexpected costs for site prep. You're looking for level ground with good drainage and easy access for delivery trucks and construction crews.
At the same time, you need to dig into local building codes and zoning laws. A quick call to your local planning department will tell you about setback requirements, height restrictions, and what permits you’ll need for a steel structure. Skipping this step can get your project shut down before you even break ground.
Pro Tip: When you're looking at codes, pay special attention to the snow and wind load requirements for your exact location. These ratings are non-negotiable. They determine the engineering specs for your building's frame and ensure it's safe for decades to come.
Budgeting and Market Awareness
Building a realistic budget means looking beyond the sticker price of the building kit. You have to account for every single cost, including things like:
- Foundation work (that's concrete and labor)
- Permit fees and inspections
- Site prep (excavation, grading)
- Erection crew labor
- Equipment rentals like cranes or lifts
- Interior finishing (insulation, electrical, plumbing)
Market trends are a big piece of this puzzle, too. Steel prices fluctuate, and those changes can hit your project's bottom line hard. Global tariffs and economic shifts have recently pushed steel prices higher than they've been in years, affecting everything from raw materials to labor costs.
To give you a better sense of how all the pieces fit together, here's a high-level look at a typical project's lifecycle.
Key Phases of a Steel Building Project
| Phase | Core Activities | Main Objective |
|---|---|---|
| Planning & Design | Site selection, code review, budgeting, engineering drawings. | Create a complete, permit-ready blueprint for the entire project. |
| Foundation Work | Site prep, excavation, pouring concrete slab/footers. | Construct a solid, level base that meets engineering specifications. |
| Framing Erection | Assembling the primary and secondary steel framework. | Build the structural skeleton of the building safely and accurately. |
| Panel & Trim Install | Attaching wall panels, roof sheeting, and finishing trim. | Enclose the structure, making it weathertight and complete. |
| Finishing Touches | Installing doors, windows, insulation, and interior systems. | Complete the building for its intended use and final inspection. |
Getting a firm grasp on these phases helps you anticipate costs and manage the timeline effectively.
Keeping an eye on market trends and understanding all potential expenses helps you budget with confidence. For a deeper dive into what you can expect, exploring options for custom steel buildings will give you a much clearer picture of your potential investment.
This infographic breaks down the essential flow of the initial planning phase.
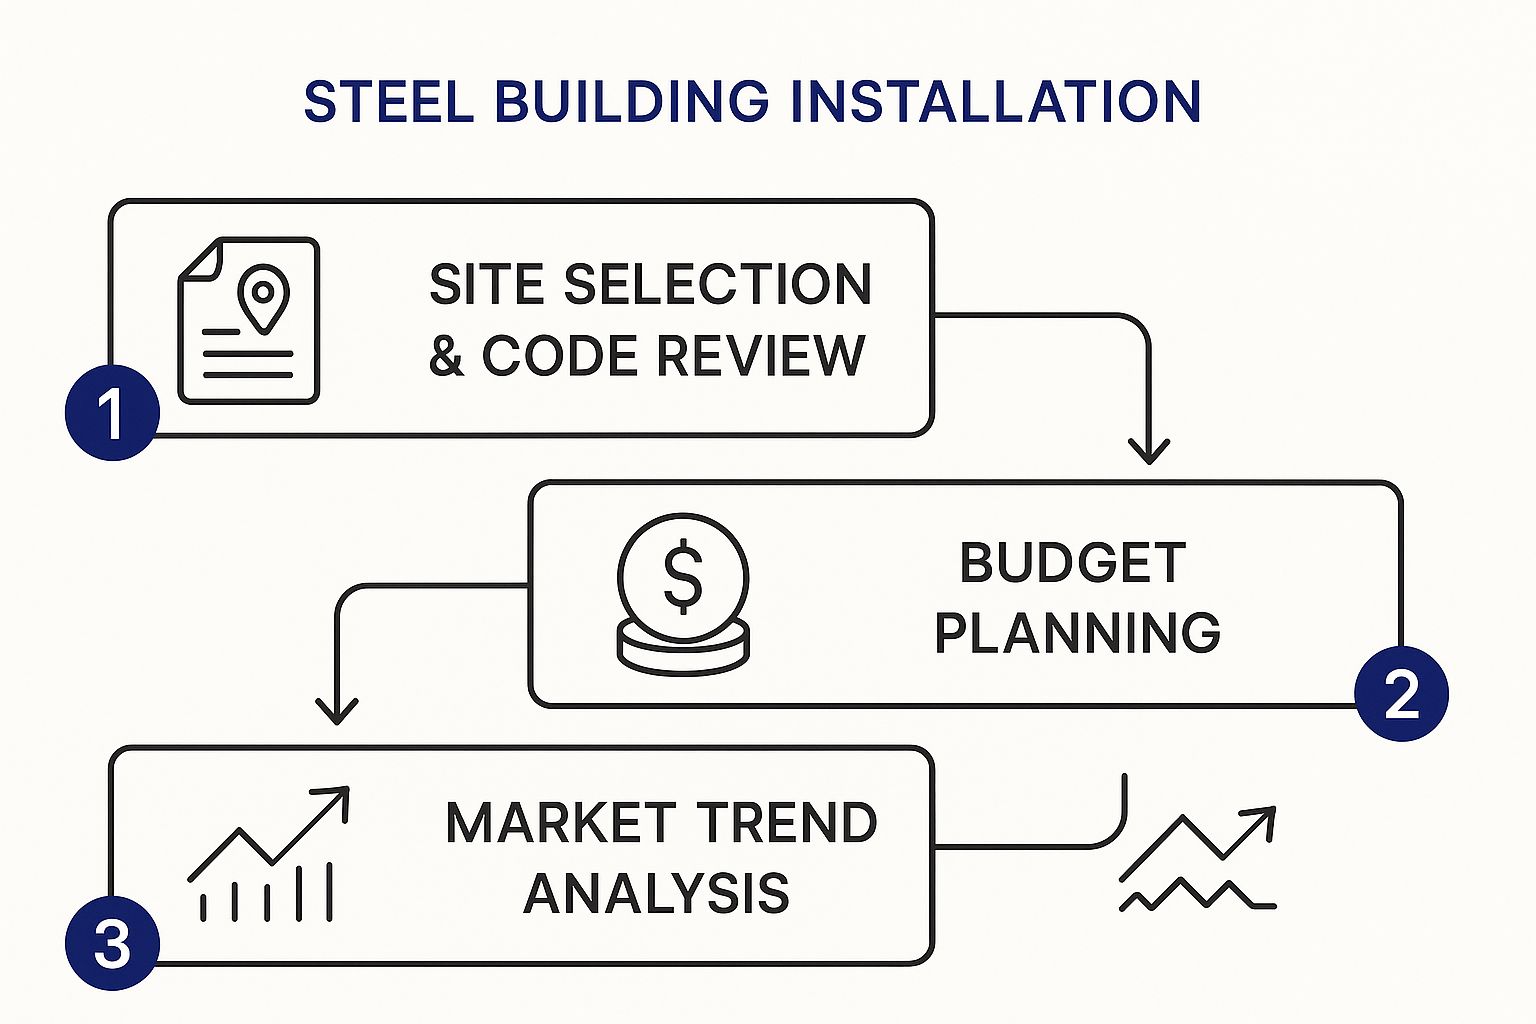
As you can see, site selection, budget planning, and market awareness aren't separate tasks—they're interconnected steps that form the bedrock of a successful build.
Laying a Rock-Solid Foundation
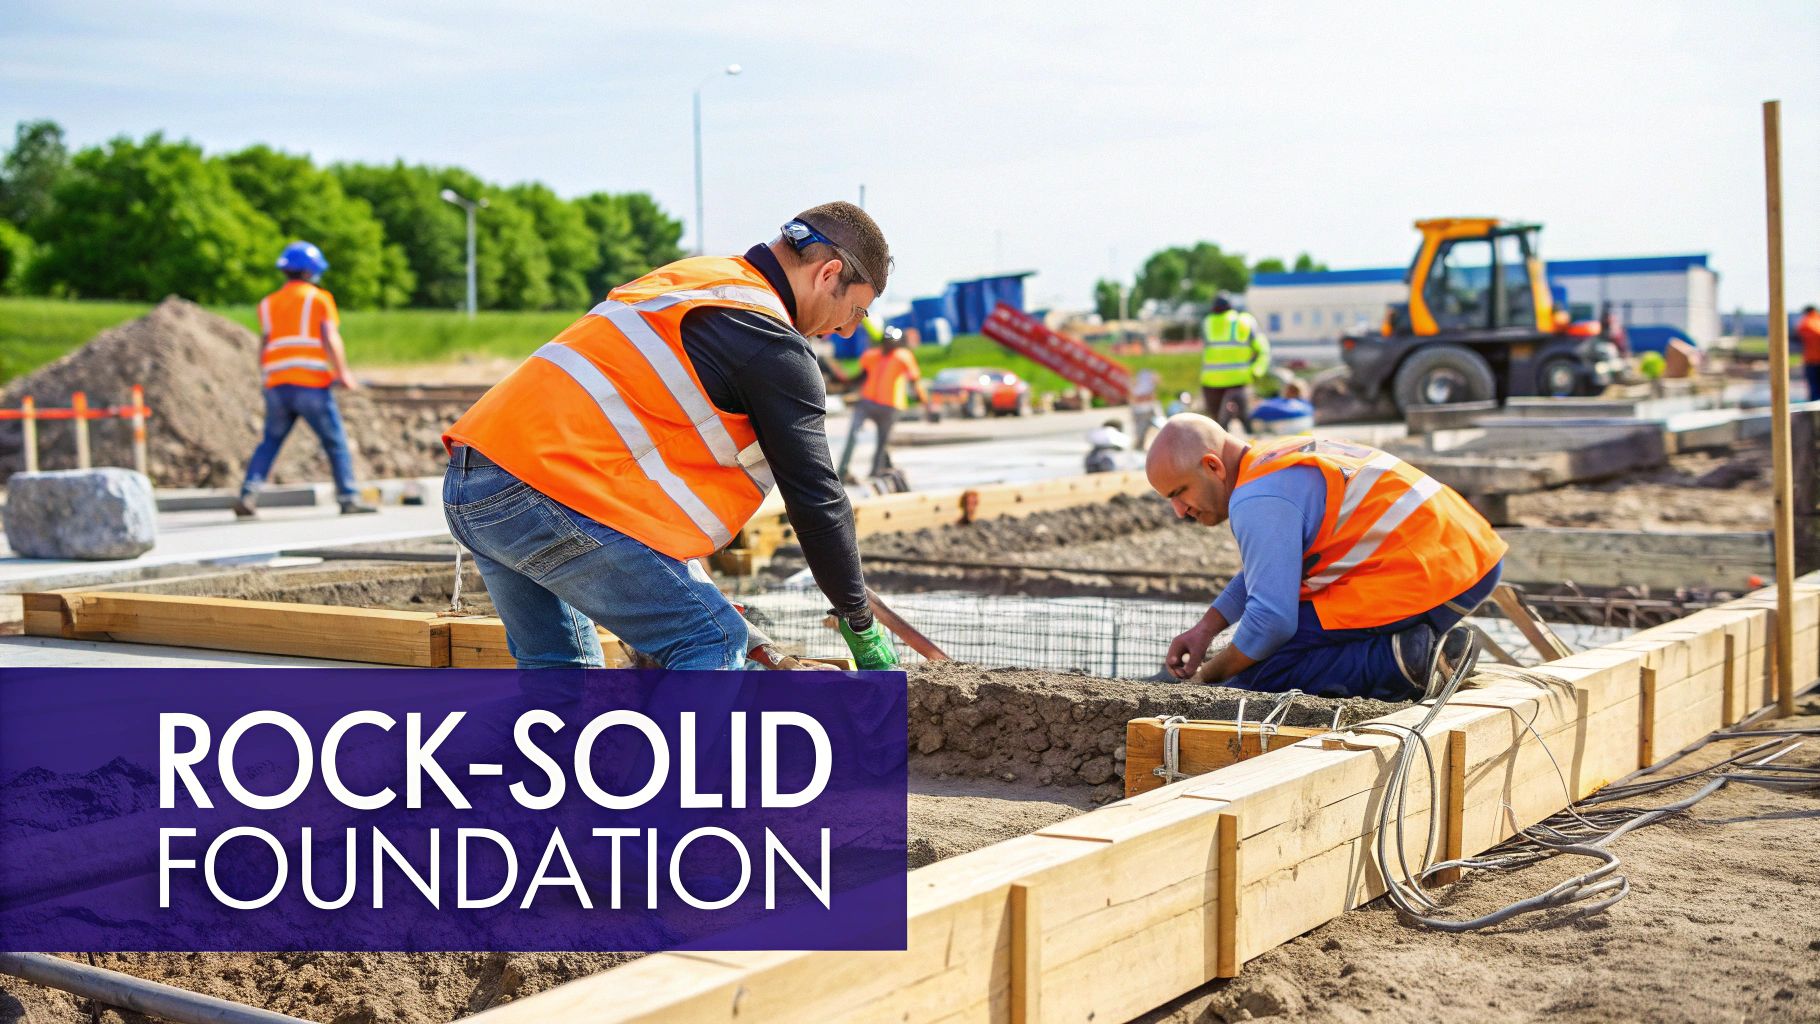
You can have the best steel building kit on the market, but if the foundation is weak, the whole project is a wash. This is the one stage where you absolutely cannot cut corners. Even tiny mistakes here can snowball into massive headaches during framing and paneling.
Your entire steel building installation quite literally rests on the quality of the concrete work you do now.
Before a single bag of cement is mixed, the site needs to be perfectly prepped. That starts with a soil analysis to understand what you're building on, which will dictate everything from your concrete mix to how deep your footings need to go. Proper grading is just as crucial—you need to make sure water drains away from your building, not toward it.
The actual work kicks off with precise excavation for footings, which are the bedrock of your building's stability. Once the ground is ready, it’s time to pick the right foundation for your project.
Choosing Your Foundation Type
Not all foundations are built the same. The right one for you depends on your building's size, its future use, and your local climate. A small backyard workshop in Arizona has very different needs than a massive commercial warehouse in a state with a deep frost line.
Here are the most common options you'll run into:
- Slab Foundation: This is the most straightforward approach—a single, thick pour of concrete that acts as both the foundation and the floor. It’s cost-effective and a go-to for garages, workshops, and smaller warehouses that won't house extremely heavy machinery.
- Pier Foundation: Instead of a full slab, this system uses individual concrete columns placed strategically to support the building's main steel columns. It's a great solution for sloped or uneven lots, but remember, you'll need to build a separate flooring system on top.
- Perimeter Wall Foundation: Often called a frost wall, this involves a continuous concrete wall around the building's perimeter. It provides heavy-duty support and is essential in colder climates where footings must sit below the frost line to prevent the ground from heaving and damaging your structure.
You have to get this right, which means understanding the specific engineering plans and local building codes. You can dive deeper into these critical specs in our detailed guide on steel building foundation requirements.
A common mistake I see is people treating the foundation like a simple concrete pour. The truth is, anchor bolt placement is a game of millimeters. An anchor bolt that's just a half-inch off can throw your entire steel column alignment out of whack, forcing you into costly and frustrating fixes down the road.
Pouring Concrete and Setting Anchor Bolts
With your forms built and rebar tied, the concrete pour is the moment of truth. Make sure you have enough people on hand to spread and level the concrete before it starts to set. Don't skip using a concrete vibrator—it’s the only way to get rid of air pockets that create hidden weak spots in the slab.
The most critical part of the pour is setting the anchor bolts that will connect your steel frame to the concrete. These bolts must align perfectly with the holes in your building’s base plates. Use the template provided by your manufacturer and check your measurements again and again before the concrete hardens.
This is where being meticulous pays off. Get it right, and the rest of your steel building installation will go up smoothly.
Raising the Steel Frame
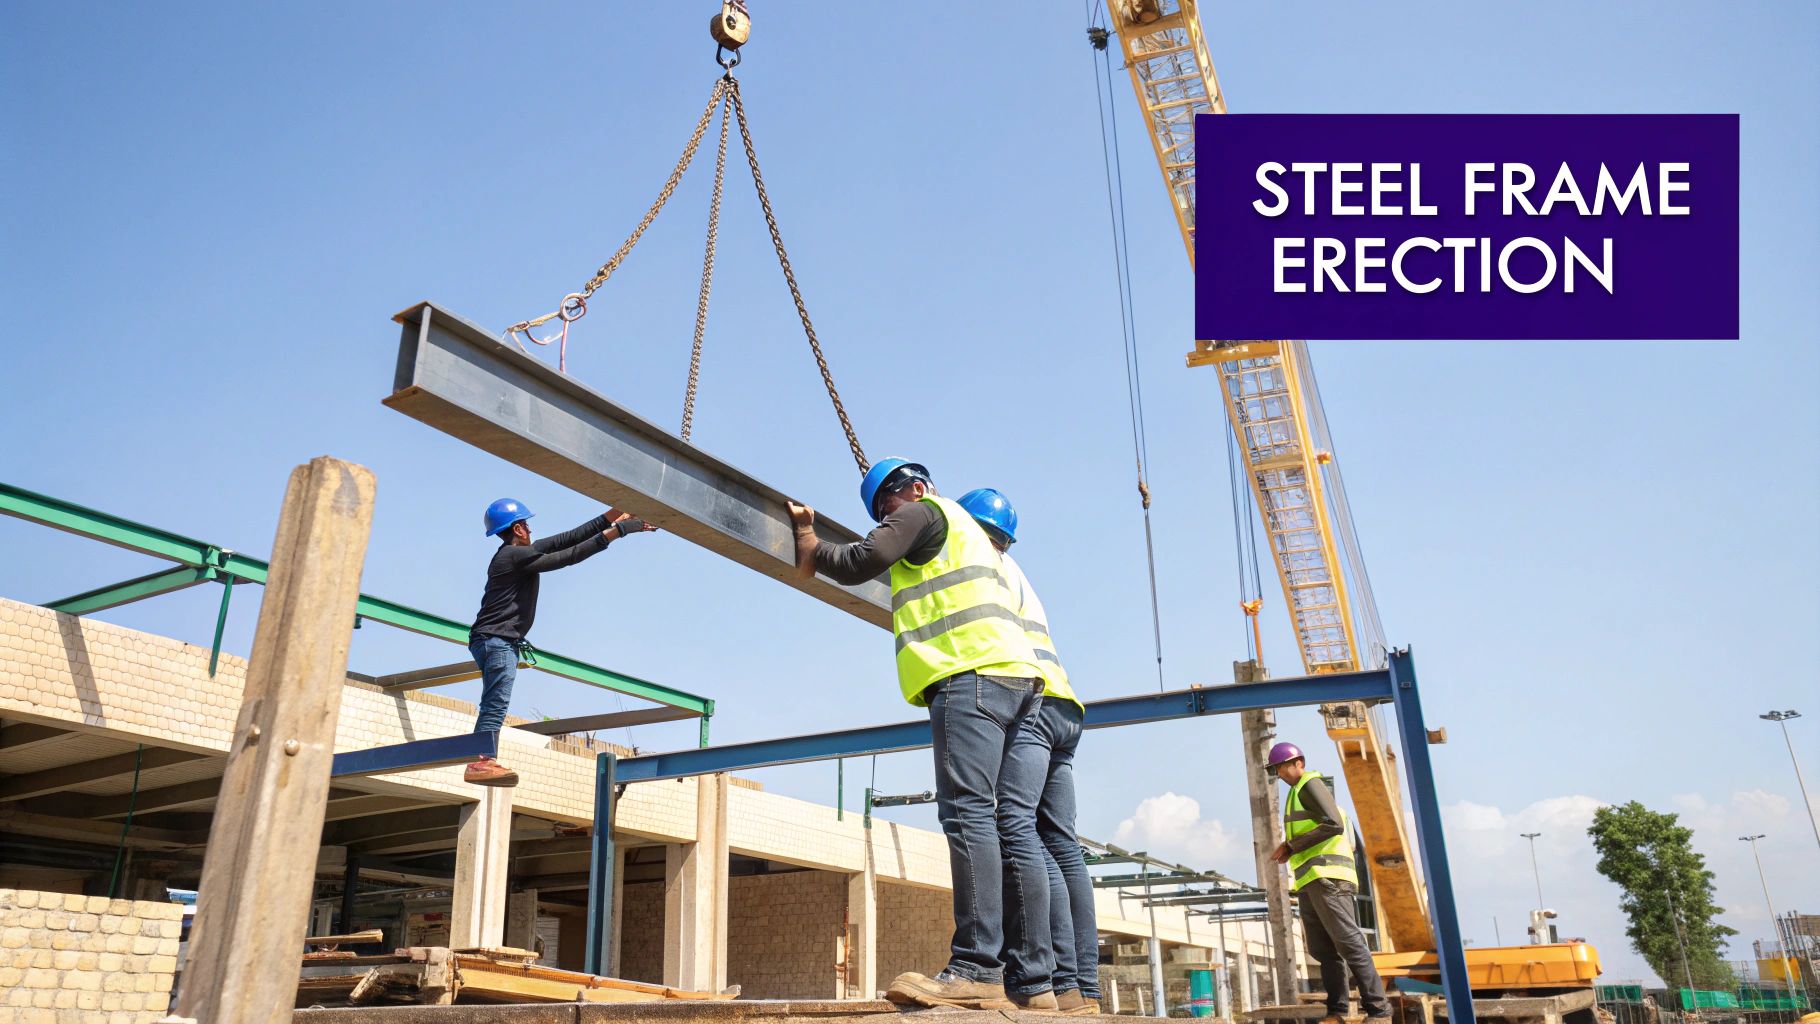
Now for the exciting part. With your foundation perfectly cured and ready, it's time for the most dramatic phase of your steel building installation. This is where your vision truly starts to take shape, rising from the concrete slab to become a recognizable structure.
Success here is all about organization and a methodical approach. A bit of prep work before you start lifting heavy steel will save you countless hours of frustration down the road.
Before you touch a single beam, lay out all your primary framing components. Get your columns, rafters, and haunch brackets staged and organized according to your erection drawings. This simple step turns a potentially chaotic job site into an efficient assembly line, ensuring you can grab the right piece at the right time.
Erecting the Primary Structure
The first move is to get the main columns standing. Each column is hoisted into position and carefully lowered onto the anchor bolts you embedded in the foundation. For now, just loosely tighten the nuts. You'll want some wiggle room to make final adjustments later, making sure everything is perfectly plumb and square.
With your first pair of opposing columns up, you can lift the corresponding roof rafters into place. A crane or telehandler is absolutely essential for this—these beams are incredibly heavy. The rafters are then bolted to the columns, creating your first rigid frame section, also known as a "bay."
This initial bay is the most important one you'll build. Get it right, and it sets the standard for the entire structure.
Safety is Paramount: Always use certified lifting equipment and have a designated spotter on the ground. Anyone working at heights needs proper fall protection, like harnesses and lanyards. A cardinal rule: never work under a suspended load. Make sure the entire crew is clear on the signals used by the crane operator.
Once the first bay is secure and temporarily braced, you'll simply repeat the process for the next bays, connecting each new frame section to the last one. Keep your level and string line handy—constant checks are non-negotiable to maintain alignment.
Installing Secondary Framing
With the main skeleton standing tall, it's time to add the secondary framing. These are the components that provide crucial lateral support and create the mounting surface for your wall and roof panels. We're talking about the girts (for the walls) and purlins (for the roof).
This stage is what gives the building its overall rigidity. Here’s a quick breakdown of how these pieces work:
- Girts run horizontally along the walls, connecting the main columns together.
- Purlins run perpendicular across the roof rafters, creating the support structure for your roofing panels.
Installing these components is what ties the entire frame together, transforming it from a series of individual bays into a single, incredibly robust unit. Pay close attention to the bolt patterns and spacing detailed in your manufacturer’s plans, as getting this right is a key step in a successful steel building installation.
For a deeper dive, you can learn all about the components of a complete metal building frame and how they function together. This knowledge is invaluable for understanding why each piece is so critical to the final structure's integrity.
Installing Wall and Roof Panels
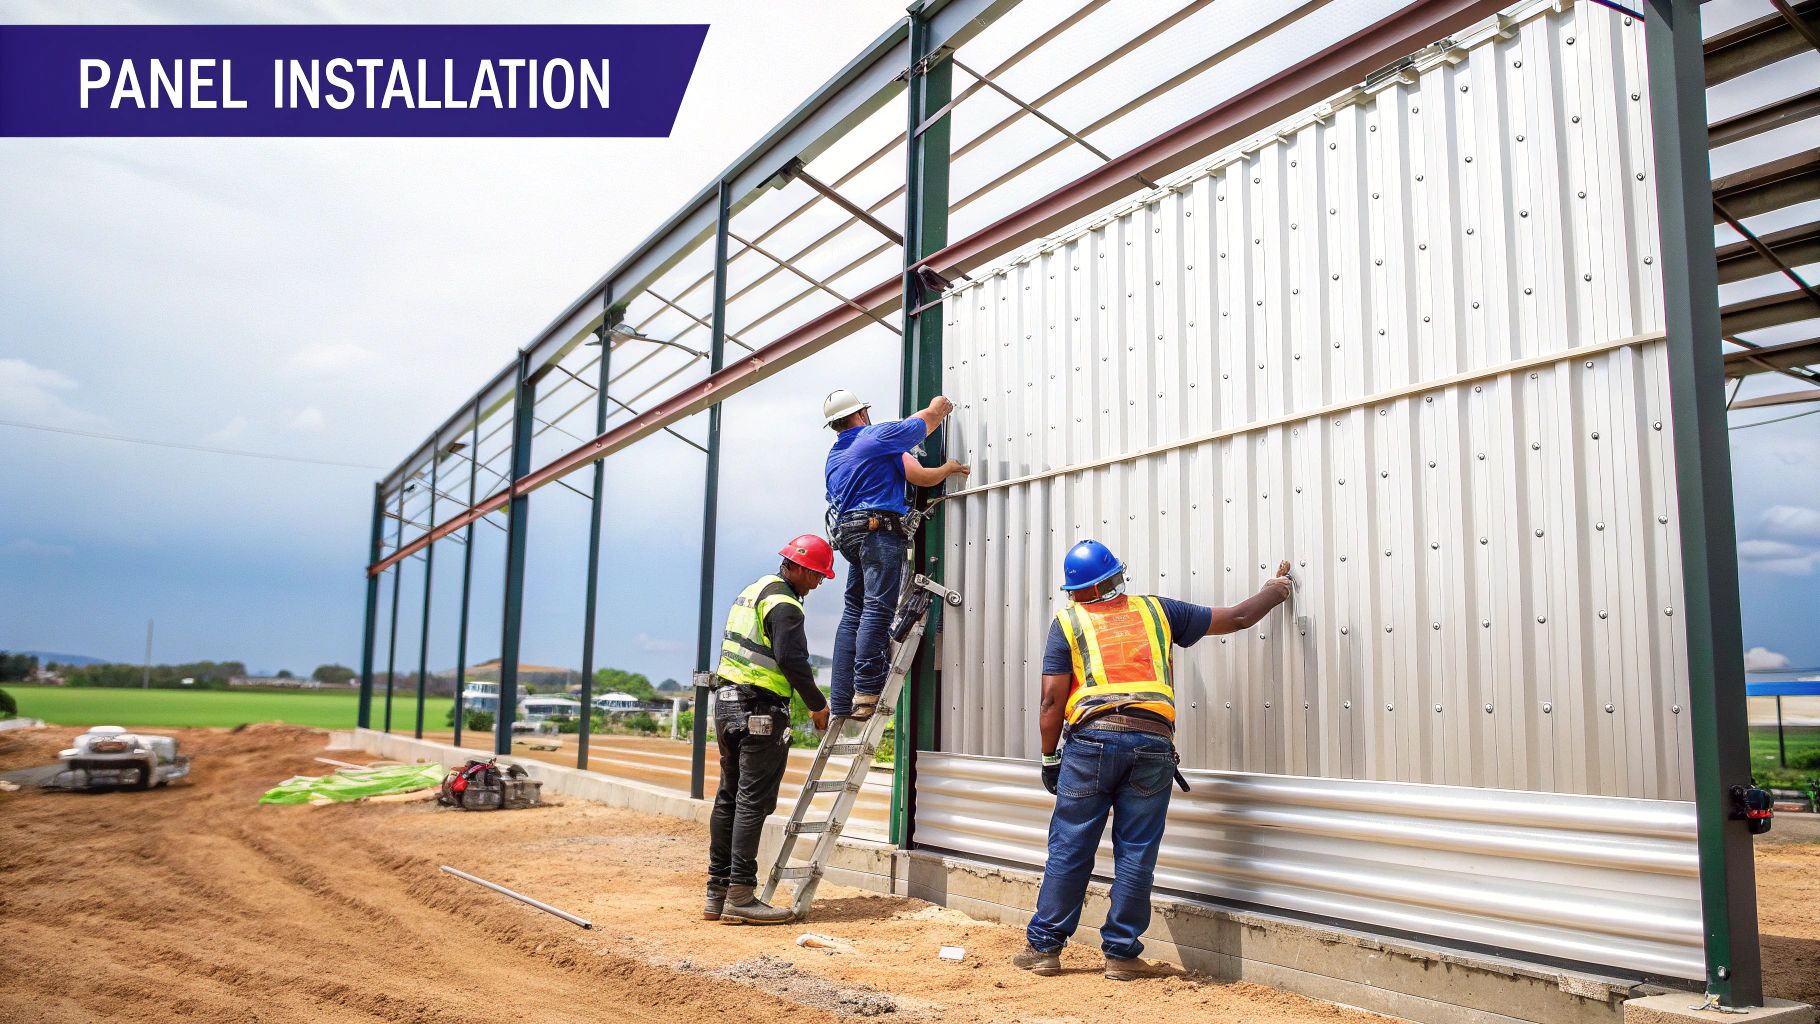
With the frame standing strong, your project is about to transform from a steel skeleton into a fully enclosed building. This is the stage where your structure truly takes shape, gaining its identity and its primary defense against the elements. Installing the wall and roof panels is a part of the steel building installation that demands precision and a methodical workflow.
Handling large metal sheets isn't something you want to improvise. Before you lift the first panel, get organized. Have your sealants, fasteners, and power tools laid out and ready to go. A scattered approach here is a recipe for scratched panels, misaligned seams, and a long, frustrating day.
Mastering Wall Panel Installation
The best way to hang wall sheeting is to start at one corner and work your way across the building. This simple technique is the key to maintaining a straight, professional-looking line from one end to the other. Before you do anything else, make sure that very first panel is perfectly plumb—it’s the guide for everything that follows.
As you place each panel, pay close attention to the overlap. Those interlocking edges are engineered to create a watertight seal, but only if they’re engaged correctly. Use the exact fasteners specified in your building plans, driving them straight through the panel and into the girts behind it.
Crucial Fastener Tip: Avoid the common mistake of over-tightening the screws. When you drive them in so hard that they dimple the panel and crush the rubber washer, you’ve actually broken the weatherproof seal. This creates a perfect spot for leaks down the road. The screw should just be snug, never squashed.
Sealing the Roof and Preventing Leaks
Roof panel installation follows a similar logic to the walls, but with an even bigger focus on weatherproofing. This is where quality really counts. You'll want to begin installing panels from the downwind side of the roof, which is typically opposite the prevailing wind direction. A critical component here is a good underlayment; for a deep dive, this guide on understanding roof underlayment is an excellent resource.
Starting downwind ensures that each overlapping seam is shielded from driving rain and wind. It creates a shingle-like effect that naturally sheds water.
Once all the panels are securely in place, the final step is to install the trim and flashing. These are the pieces that seal the building’s most vulnerable points and give it that clean, finished look.
- Ridge Caps: Seal the peak of the roof where the two slopes meet.
- Eave Trim: Finishes the edge of the roofline right above the sidewalls.
- Corner Flashing: Covers the vertical joints where two walls come together.
- Base Trim: Seals the bottom of the wall panels where they meet the foundation.
Taking the time to cut panels neatly for door and window openings will give your project a truly professional appearance. If you're exploring options for different project sizes, our ultimate guide to steel building kits is packed with valuable insights for both residential and commercial applications.
Adding Doors, Windows, and Insulation
Once the shell of your steel building is up, it's time to focus on the details that really turn it into a usable space. This is where you seal the building envelope by adding doors and windows, then lock in climate control with the right insulation. These finishing touches are what make your structure functional, comfortable, and valuable.
The first job is to frame out the openings for your doors and windows. Your building kit should come with specific header and jamb pieces designed to fit perfectly with the girts and columns. These aren't just cosmetic—they provide the structural backbone needed to support a heavy roll-up door or a large window, preventing any warping or sagging down the line.
Speaking of materials, the availability and cost of steel can shift based on global trends. The global steel market outlook from the OECD shows that worldwide steelmaking capacity is projected to keep growing through 2025. This can sometimes put downward pressure on prices, but it's always good to be aware of how market dynamics might affect your project's material costs.
Installing Doors and Windows Correctly
With the openings framed and ready, you can get to the installation itself. For standard walk doors and windows, the process is pretty similar to what you’d see in traditional construction. The name of the game is getting the unit perfectly level and plumb before you fasten it in place. Then, you create a completely weatherproof seal using high-quality caulk and flashing tape all the way around the perimeter.
Roll-up doors, however, are a different animal. They're more of a mechanical install. The general steps look something like this:
- Mount the Brackets: Start by securely attaching the vertical track brackets right onto the jambs of your framed opening.
- Install the Door Curtain: This part usually takes a couple of people. Carefully lift the rolled-up door curtain onto the brackets and get it attached.
- Set the Tension: This is the most critical part of the job. Getting the spring tension just right is absolutely essential for the door to operate smoothly and, more importantly, safely.
A rookie mistake we see all the time is skimping on the sealant around windows and doors. Even a tiny gap can become a major headache, letting in drafts and water that lead to leaks and sky-high energy bills. Take your time here—it’s worth it.
Choosing and Installing Insulation
Insulation is the final piece of the puzzle. It does more than just keep your building warm in the winter and cool in the summer. It’s your number one defense against condensation—that pesky moisture that can cause rust and ruin anything you have stored inside.
Insulation's performance is measured by its R-value. A higher R-value means it's better at resisting heat flow, and what you need really depends on your local climate.
Here are a few of the most common options you'll run into:
- Fiberglass Batts/Blankets: This is the go-to for many builders. It's cost-effective, familiar, and easy to roll out between the framing members.
- Spray Foam: If you want a top-tier air seal and moisture barrier, this is it. Spray foam expands to fill every nook and cranny, delivering a high R-value per inch. The trade-off is a higher upfront cost.
- Rigid Board: These foam panels are simple to cut and fit, and they're great for creating a continuous thermal break to stop heat from transferring through the steel frame.
No matter which type you choose, always install a vapor barrier on the "warm" side of the insulation (the interior side in most climates). This simple plastic sheeting is your best friend for stopping warm, moist air from hitting the cold metal panels, which is how condensation forms. It’s a small step that protects the long-term health of your entire building.
Common Steel Building Installation Questions
Even the most buttoned-up plan will have a few question marks. When it comes to your steel building installation, getting clear answers ahead of time can be the difference between a smooth project and a major headache. Let's dig into some of the most common questions we get from builders and first-time owners.
DIY vs. Professional Crew
One of the first big decisions is whether you should tackle the installation yourself or bring in the pros. Honestly, many pre-engineered kits are designed for the skilled DIYer. If you're putting up a small garage or a simple workshop, a team with solid mechanical skills and the right equipment can absolutely handle it.
But scale is the real game-changer here. For bigger or more complex structures—think commercial warehouses or sprawling agricultural buildings—the value of a professional erection crew can't be overstated. They show up with specialized gear like cranes and lifts, carry the proper insurance, and bring years of experience that keeps the job site safe and moving efficiently.
Typical Installation Timelines
So, how long does this all take? The timeline for a steel building installation can swing wildly depending on the project. A small garage kit? An experienced crew might have it framed and sheeted in a single weekend once the foundation is fully cured. A medium-sized workshop, on the other hand, is more likely to take one to two weeks.
Massive industrial buildings can require several weeks, or even a couple of months, to complete. Always remember to build these variables into your schedule:
- Building Size and Complexity: The bigger and more intricate the design, the more time you'll need. Simple as that.
- Crew Experience: A seasoned professional team will always outpace a first-time DIY crew.
- Weather: Never underestimate Mother Nature. Rain, high winds, or extreme heat can shut a job site down for days.
- Foundation Curing Time: This is a big one people forget. The concrete needs a solid 7-28 days to properly cure before you can even think about raising the first column.
Planning your project's timeline goes hand-in-hand with understanding all the expenses involved. For a complete picture, you can learn more about the average cost of a steel building from the factory floor to the final bolt.
Avoiding Common Mistakes
After years in this business, you learn exactly where things can go wrong. The costliest and most frequent errors almost always boil down to three things: a bad foundation, ignoring the plans, and cutting corners on safety.
An out-of-square or unlevel foundation is a project-killer. It creates a domino effect of alignment problems that will make framing and paneling an absolute nightmare. Second, follow the manufacturer's erection drawings to the letter. They were engineered for a reason, and making your own "adjustments" can seriously compromise the building's structural integrity.
Finally, safety is not optional. Using proper fall protection, respecting heavy equipment, and keeping a clean site are non-negotiable. A little extra time spent double-checking your work and making safety the priority will save you from the biggest installation headaches.
At Icon Steel Buildings, we provide the durable, American-made materials and expert guidance you need to ensure your project is a success from start to finish. Get started on your custom building today at https://iconsteelbuildings.com.