
Getting a metal building installed is an exciting milestone, but the real key to a smooth project is knowing what comes before the crew ever shows up. It’s a journey that starts with careful planning and ends with a structure built to last.
Success isn’t about just watching it go up; it’s about being prepared for every step—before, during, and after installation day.
Your Metal Building Installation Journey From Start to Finish
When you know what to expect, having a metal building installed is a pretty straightforward process. Think of this guide as your complete roadmap. We’ll walk you through every critical phase, from locking in your design to the final walkthrough and even long-term care. Our goal is to give you the confidence and know-how to manage your project without any surprises.
The journey begins long before the first steel panel is unloaded from the truck. In fact, success is built on a foundation of solid preparation.
Laying the Groundwork for Success
The initial stages are all about turning your vision into a workable plan. This is where you translate your ideas—whether it’s for a simple workshop, a two-car garage, or a massive RV storage building—into a concrete design. Rushing this part of the process is a recipe for expensive changes down the road or ending up with a building that doesn’t quite fit your needs.
To get started on the right foot, you’ll want to focus on a few core areas:
- Defining Your Purpose: First things first, what are you using this building for? The answer to that question drives every other decision, from the building’s dimensions to where you place the doors.
- Site and Foundation Prep: A level, clear site isn’t just a friendly suggestion—it’s a non-negotiable requirement for a stable and secure installation.
- Navigating Local Rules: Taking the time to understand and pull the necessary permits saves you from major legal headaches and ensures your building is 100% compliant with local codes.
From Blueprint to Reality
Once all the prep work is done, the physical installation can finally kick off. The process itself is surprisingly efficient, but knowing the sequence of events helps you get everything ready for the big day. Our installation crews work methodically to assemble the structure, turning a collection of steel components into a fully functional building—often in just a day or two.
The most overlooked step by first-time buyers is confirming site access. A massive delivery truck and an installation crew need a clear, unobstructed path to your build site. Forgetting this simple detail can cause significant—and costly—delays on installation day.
After the last screw is tightened, you’ll do a final walkthrough with the crew. This is your chance to inspect every detail and make sure everything is perfect. With just a little bit of ongoing maintenance, your new metal building will give you decades of reliable service, protecting your valuable assets and serving its purpose flawlessly.
Planning Your Perfect Building Before Installation
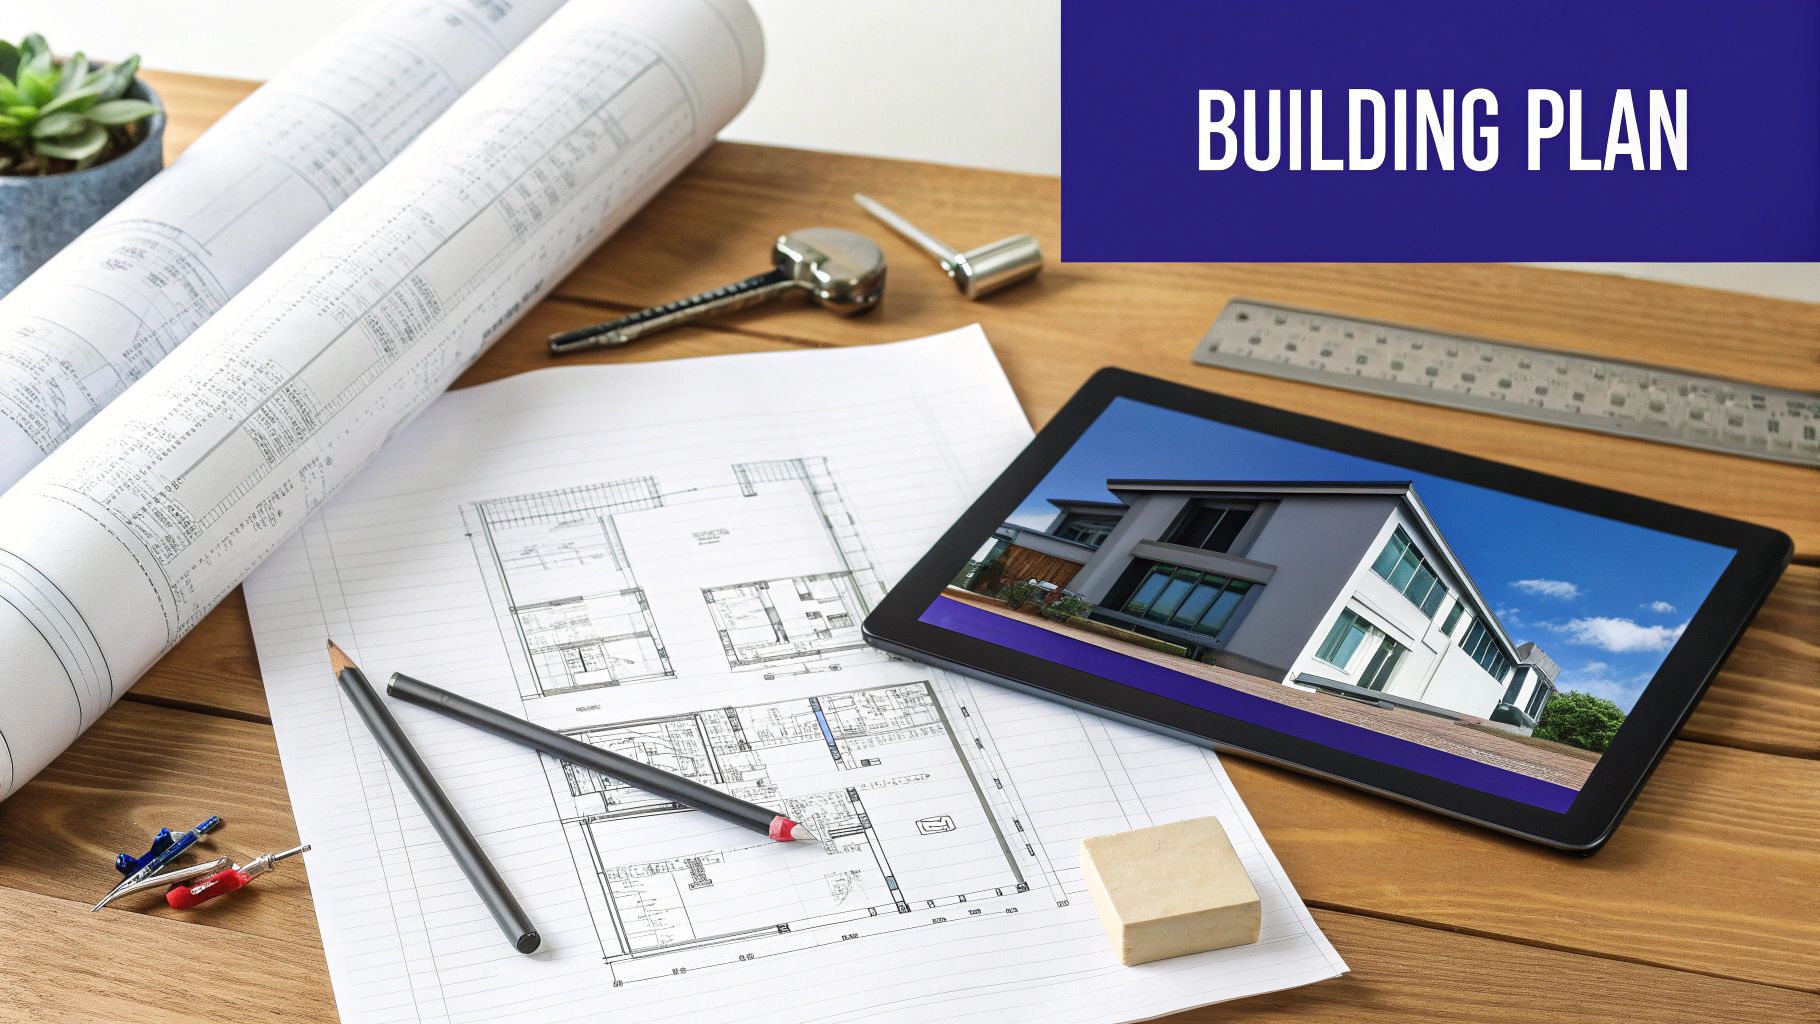
Here’s something I’ve learned over the years: the most successful installations are locked in long before our crew ever sets foot on your property. This planning phase is where your vision gets translated into a practical, detailed blueprint.
It’s truly the difference between a building that just “works” and one that perfectly serves your needs for decades. Getting these details right upfront is the single best way to guarantee a smooth process, helping you sidestep the frustration of last-minute changes or unexpected costs.
Defining Your Building’s Purpose and Dimensions
First things first, what is this building actually for? That one question drives every single decision that follows. A structure designed to store a classic car has completely different requirements than a commercial workshop or an agricultural barn.
For example, an RV garage needs a tall roll-up door—often 14 feet high or more—and enough depth to comfortably house the vehicle. On the other hand, a home workshop might prioritize window placement for natural light and multiple walk-in doors for easy access. Nailing down the primary use helps you lock in the ideal width, length, and height from the get-go.
Choosing the Right Materials and Structural Options
With your purpose clear, we can move on to the bones of the building—the materials and structural elements. This isn’t just about looks; it’s about making sure your building can stand up to your specific environment for the long haul.
A few key choices you’ll need to make include:
- Steel Gauge: This determines the building’s overall strength. A standard 14-gauge frame is great for many applications, but if you’re in an area with heavy snow or high winds, upgrading to the thicker, more robust 12-gauge steel is a wise investment.
- Roof Style: Your roof does more than keep you dry. We highly recommend a vertical roof, where the panels run from the ridge down to the eaves. It’s far superior at shedding water, snow, and debris, making it a must-have for tough climates.
- Insulation: If you plan on working inside the building or storing anything sensitive to temperature swings, insulation is non-negotiable. It helps regulate the climate, stops condensation in its tracks, and can make a huge difference in your heating and cooling bills.
It’s no surprise that steel is booming. The global market for metal building materials was valued at around $177.55 billion in 2021 and is expected to climb over $225.2 billion by 2025. People are catching on to how reliable and versatile it is.
Customizing for Functionality and Curb Appeal
Once the core structure is dialed in, it’s time for the fun part: adding the custom touches that make the building truly yours. These are the features that boost both usability and appearance, and the small details here can make a world of difference in your day-to-day use.
Think about how you’ll actually move around and use the space. Do you need more than one way to get in and out? Is natural light a top priority? How will the new building look next to your house?
Before you order, it helps to see how these key decisions connect.
Key Pre-Purchase Decisions and Their Impact
| Decision Point | Common Options | Impact on Installation & Cost |
|---|---|---|
| Steel Gauge | 14-Gauge (Standard) vs. 12-Gauge (Heavy-Duty) | 12-gauge increases the initial cost but provides superior strength for high-wind or heavy-snow areas, often required by code. |
| Roof Style | Regular, A-Frame Horizontal, Vertical | A vertical roof costs more upfront but offers the best long-term performance, reducing maintenance and preventing leaks. |
| Doors & Windows | Walk-In Doors, Roll-Up Doors, Windows | Each addition increases the price. Placement is critical and must be finalized before fabrication to avoid on-site changes. |
| Anchoring | Rebar (Ground), Concrete Anchors, Asphalt Anchors | The type of anchor depends entirely on your foundation, which must be prepared and cured before the installation date. |
| Insulation | None, Single-Bubble, Double-Bubble | Adding insulation increases material and labor costs but significantly improves energy efficiency and comfort. |
Making these choices thoughtfully ensures your building is practical from day one.
Pro Tip: When placing roll-up doors, always think about your property’s layout. You need a long, straight approach for vehicles to get in and out easily without awkward turns. It’s a simple thing that people often forget, but it’s crucial for daily convenience.
For anyone wanting to explore all the possibilities, our guide to custom steel buildings is a fantastic place to get inspired. These choices don’t just affect how your building looks—they define how it functions. Making smart decisions now ensures the final product is exactly what you envisioned.
Preparing Your Site for a Flawless Installation
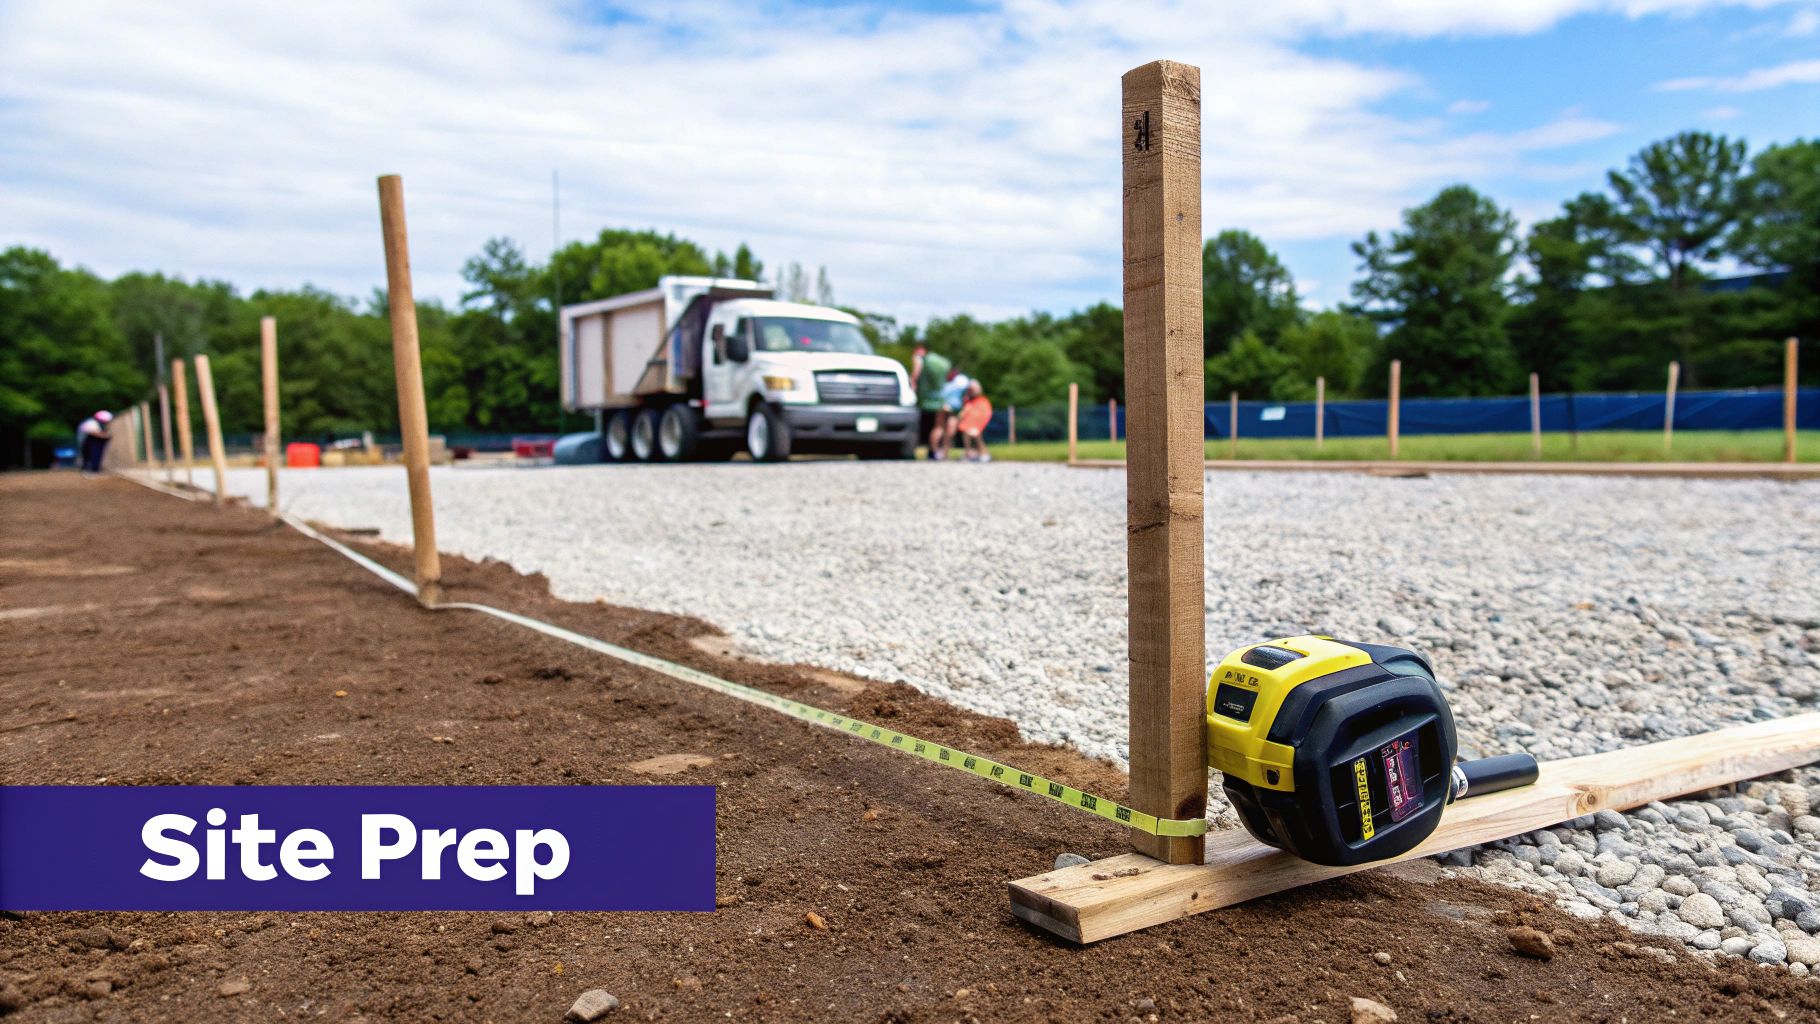
If there’s one secret to ensuring your metal building installed process goes off without a hitch, it’s this: the work you do on the ground beforehand matters more than anything else. A perfectly prepared site isn’t just a nice-to-have; it’s the absolute bedrock of a stable, long-lasting structure.
Think of it like building a house on a lumpy mattress. You just wouldn’t do it. An uneven or unstable base can lead to structural stress, problems with doors and windows, and a whole list of headaches down the road. Getting this right from the start prevents costly delays and ensures your investment stands strong for decades.
Clearing and Leveling Your Build Site
Before we can even think about the foundation, the designated area must be completely clear. This means getting rid of everything—trees, stumps, shrubs, and even thick sod—along with any rocks, debris, or old concrete that might get in the way. You need a clean slate of firm, bare soil.
Once it’s cleared, leveling the ground is the next non-negotiable step. Our installation crews, and most others in the industry, require the site to be level to within three inches from its highest to lowest point. If the site is off by more than that, the crew may not be able to proceed, which unfortunately means a return trip fee and a major delay for your project. A precise grade ensures the base rails sit perfectly flat, which is essential for a square and true building.
Choosing Your Foundation
With a clear, level pad ready to go, it’s time to decide on your foundation. The right choice really comes down to your building’s size, what you plan to use it for, and what your local codes demand.
Here are the most common options we see:
- Gravel Pad: This is a cost-effective and very popular choice. A properly compacted gravel base gives you excellent drainage, which is key to preventing moisture from wicking up and causing rust over time. It’s a solid pick for storage sheds, carports, and agricultural buildings.
- Concrete Slab: For workshops, commercial garages, or any building where you need a solid, easy-to-clean floor, a concrete slab is the gold standard. It provides maximum stability and is often required for larger or certified buildings that must meet specific wind and snow load ratings.
- Concrete Footers or Piers: This approach involves pouring concrete supports only at key structural points, like the corners and where the posts will be anchored. The rest of the floor can be left as dirt, filled with gravel, or paved later. It’s a great middle-ground solution for certain applications.
For a deeper dive into the pros and cons, our guide on steel building foundation requirements has all the detailed specs you’ll need to make an informed decision.
The most common cause of installation day delays is an unprepared site. Before scheduling your delivery, triple-check that your pad is level, the foundation is cured, and the access route is clear. Taking a few extra hours to get it right saves days of waiting.
Ensuring Clear Access and Site Safety
Your prep work isn’t done just because the ground is ready. You also need to think about logistics and safety for the day our metal building installed team arrives. The delivery truck carrying your building components is big and heavy, and it needs a clear, wide path from the road right to your build site.
Make sure there are no low-hanging tree branches, overhead wires, or tight turns that could block the truck. The crew also needs at least two to three feet of clear workspace around the entire building footprint. This elbow room is crucial for them to safely move panels, use their equipment, and properly anchor the structure. It’s also wise to protect your materials once they arrive; check out these proven strategies for security in construction to safeguard your property.
Finally, always call 811 before you dig. It’s a free service that gets local utility companies to come out and mark underground lines. This simple phone call is a critical safety step that can prevent a dangerous—and very expensive—accident, protecting both you and the installation crew.
Navigating Building Permits and Local Codes
Let’s be honest, dealing with permits can feel like a major chore. But it’s one of the most critical steps in the entire process. Trying to sidestep this phase is a costly mistake that can bring on serious fines, stop-work orders, or—in a worst-case scenario—your local government demanding you tear the whole thing down.
Getting this right from the very beginning ensures your project is legal, safe, and built to last.
The first move is always to get in touch with your local building or planning department. Every city, county, and township has its own rulebook, and a quick phone call or a visit to their website is the fastest way to learn exactly what they’ll require for a new structure on your property. This simple step saves you a world of guesswork and headaches down the road.
Certified vs. Non-Certified Buildings
One of the first things your local authority will ask is whether your building is “certified.” Knowing the difference is key to a smooth approval process.
- Non-Certified Buildings: Think of these as standard, sturdy structures designed for areas with more relaxed building code enforcement. They are perfectly reliable for general use but don’t have the official engineering stamps required in stricter jurisdictions.
- Certified Buildings: This is the real deal. A certified building includes engineered drawings and blueprints, officially stamped by a licensed engineer. These documents are proof that the structure is designed to meet or exceed specific local requirements for wind speed and snow load.
In many places, certification isn’t just a good idea—it’s mandatory to get a building permit. Even if it’s not required in your area, choosing a certified building gives you an extra layer of confidence that your new structure can handle the toughest weather your region can throw at it.
Gathering Your Documents for Approval
Once you know what your local office needs, it’s time to pull together the paperwork for your permit application. While the specifics can vary, most building departments ask for a fairly standard set of documents before they give you the green light.
You’ll almost certainly need to provide:
- Engineered Drawings: For a certified building, these are non-negotiable. We provide these detailed plans to prove the building’s structural integrity.
- Site Plan: This is just a simple map of your property showing where the new metal building will sit. It needs to clearly mark the distances from property lines, your house, and any other structures.
- Foundation Plans: If you’re pouring a concrete slab, your local office will want to review the foundation plans to ensure they meet code.
Getting your permit approved before the building is delivered is an absolute must. Do not schedule your installation until you have that official permit in your hand. This prevents the nightmare scenario of a building kit arriving on your property with no legal way to install it.
Pre-engineered structures are exploding in popularity, especially in high-growth areas. In the United States, Southern states have seen a massive surge in metal building projects. Texas, for example, led the nation in commercial real estate spending in 2022 at around $70 billion, a trend that directly fuels the demand for compliant, professionally engineered buildings.
Getting this administrative work done right ensures your entire project is above board from day one. If you’re still figuring out the right structure for your property, our guide to finding a metal shop building near you has some great advice on picking a building that meets both your practical needs and your local codes.
What to Expect on Installation Day
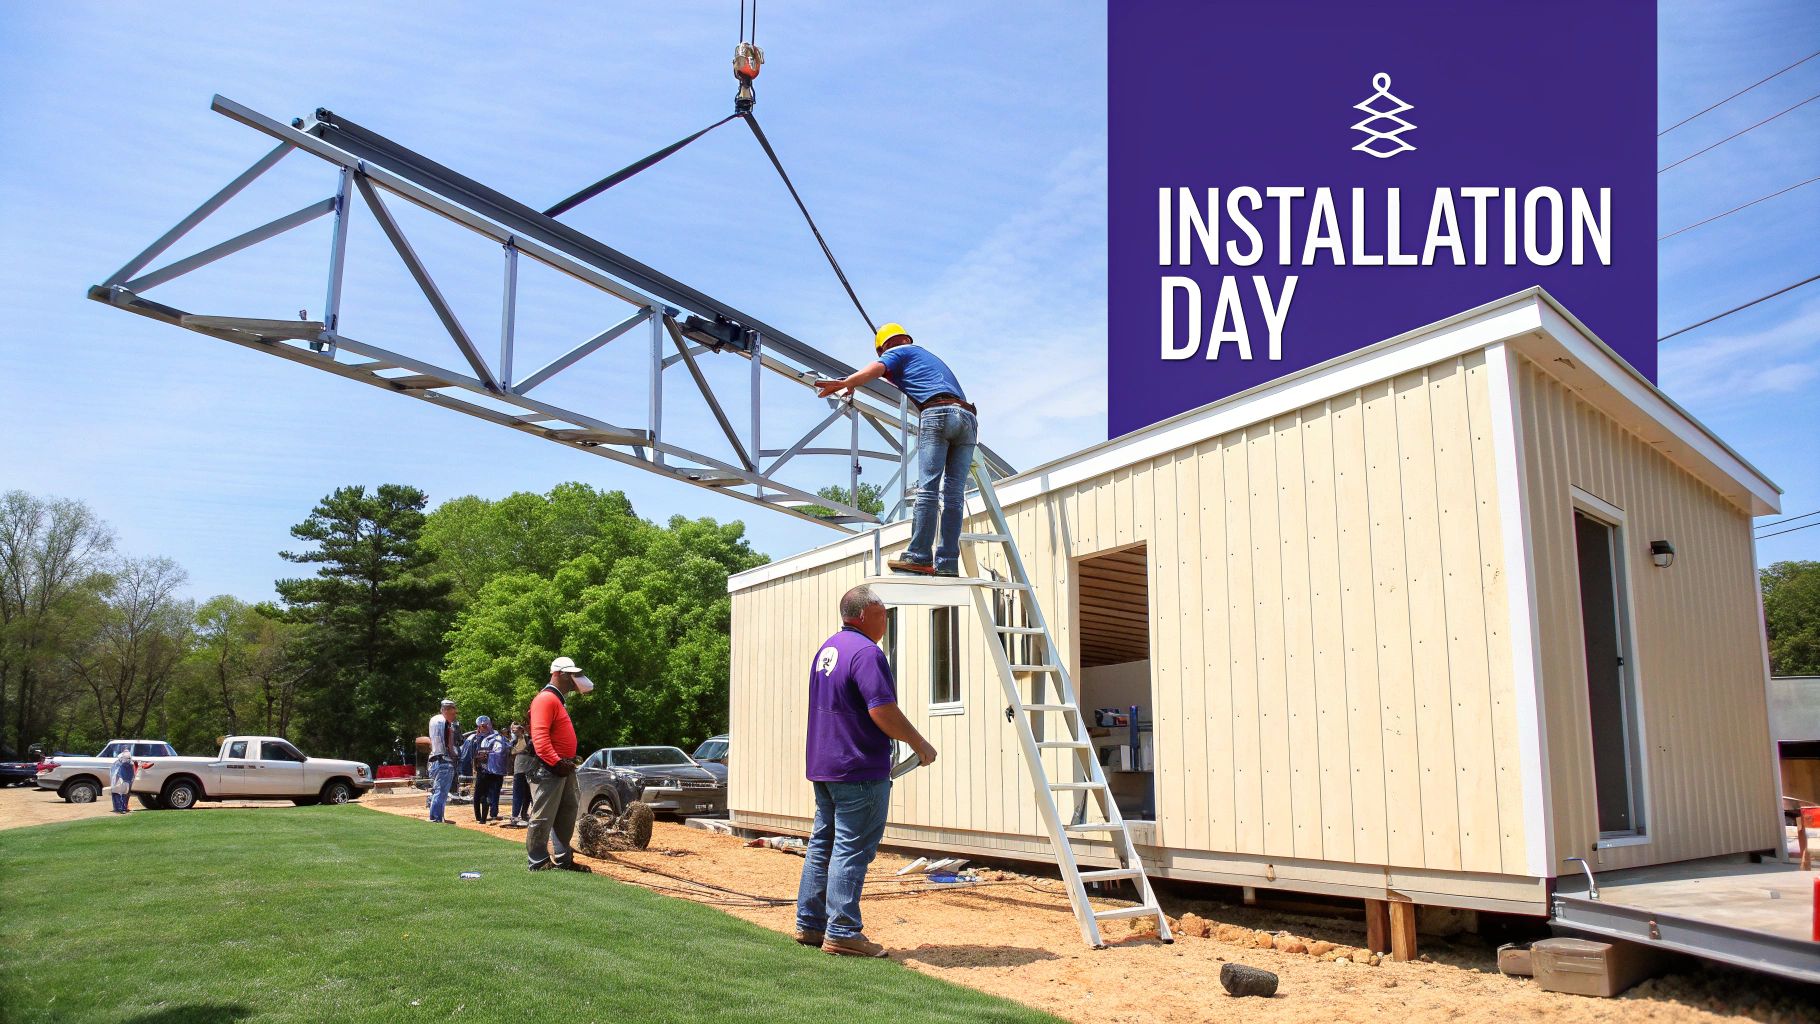
After weeks of planning and site prep, this is the day your vision finally starts taking shape. The arrival of the metal building installed team is where all that preparation pays off, and knowing the flow of the day makes the whole experience exciting instead of stressful.
When our crew shows up, they get right to work. They’ve assembled countless buildings just like yours, so their process is methodical, efficient, and surprisingly fast. Let’s walk through what you can expect from the moment they arrive to the final handshake.
Crew Arrival and Unloading Materials
The day kicks off when our installation crew arrives, usually in the morning. Their first move is a quick site assessment to make sure everything matches the plans. They’ll double-check that the foundation is level and ready, and that they have clear access to the build site.
Next comes the unloading. You’ll see the crew carefully staging all the components—framing, trusses, wall and roof panels, and boxes of fasteners—around the foundation. This isn’t random; it’s a strategic layout designed for maximum efficiency, putting every piece exactly where it’s needed for the next step.
The Assembly Process Unfolds
With everything staged, the real action begins. The team starts by laying out and anchoring the base rails, which form the exact footprint of your new building. Getting this part perfectly square is critical, as it sets the stage for the entire structure.
Once the base rails are secure, the main steel frame goes up. Corner posts, side posts, and the signature bow-shaped trusses that support the roof are assembled piece by piece. It’s pretty incredible to watch the skeleton of your building rise from the ground up.
After the frame is standing strong, the crew hoists the trusses into position and fastens them securely. Then come the walls, followed by the roof panels. They work systematically, using specialized screws with rubber washers to create a completely watertight seal. It’s a precise process that quickly transforms a steel frame into a fully enclosed, weatherproof building.
Your Role on Installation Day: Your main job is simply to be available. Our crew is self-sufficient, but they might have a quick question about the final placement of a door or window. Being reachable by phone or on-site can prevent minor delays and ensure every detail is exactly how you want it.
How Long Does Installation Take?
The time it takes to get your metal building installed can vary quite a bit. A few key factors will determine the final timeline.
Here’s what influences the build time:
- Building Size: A simple, single-car garage might only take a few hours. A large commercial building or a complex workshop, on the other hand, could easily take a full day or even stretch into a second.
- Building Complexity: Custom features always add time. Things like lean-tos, multiple roll-up doors, and framed window openings require extra steps and precision.
- Weather Conditions: Safety is our absolute priority. High winds, heavy rain, or lightning will force the crew to pause work, which can naturally extend the installation timeline.
The rapid construction time of pre-engineered systems is a huge reason for their popularity. The architectural and structural metals market was valued at $633.44 billion in 2025 and is projected to grow significantly, driven in part by this efficiency. If you’re interested in the market trends, you can read the full research about this market growth to see what’s behind the demand.
Final Touches and Walkthrough
As the installation wraps up, the crew focuses on the finishing touches. This includes installing trim pieces, anchoring the building securely to your foundation, and doing a full cleanup of the job site. They’ll pack up any leftover materials and debris, leaving your new building ready for you to use.
Want more details on our process? Check out our guide on Icon Steel’s building installation service.
The very last step is the walkthrough. The crew leader will walk the entire building with you—inside and out—to confirm that every detail meets your satisfaction. This is the perfect time to ask any final questions and admire your brand-new, fully installed metal building before signing off on the project.
Your Final Walkthrough and Long-Term Care
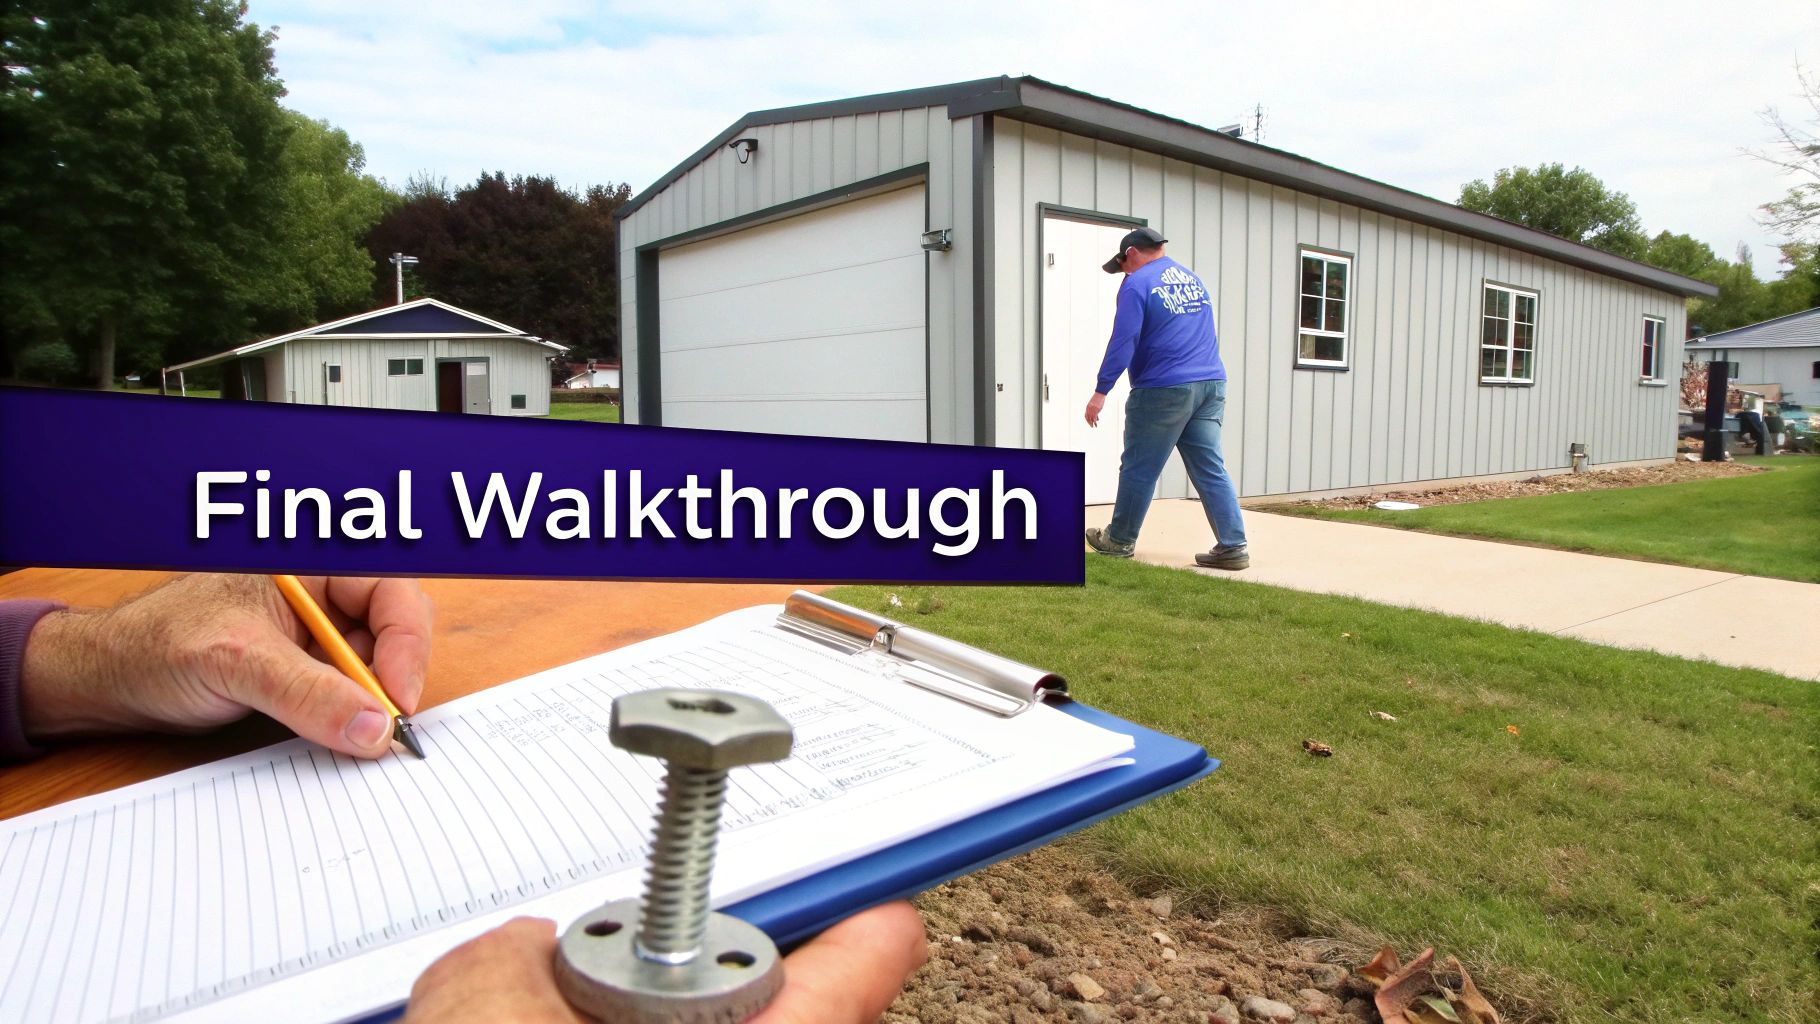
Once the last screw is tightened and the crew has packed up their tools, you’ve reached the final, critical phase of the project. This is your chance to give the building a thorough once-over and make sure every detail meets your standards before you sign off on the job.
Don’t rush this part. A meticulous final walkthrough is what protects your investment and confirms you got the quality you paid for. To make sure you cover all your bases, you might even borrow some ideas from a comprehensive commercial property inspection checklist.
Your Inspection Checklist
Grab a notepad and do a slow walk around the entire building—inside and out. The little details often tell the biggest story about the quality of the installation.
Here’s what you should be looking for:
- Screws and Fasteners: Get up close and check that every screw has its rubber washer perfectly seated and intact. Those little washers are absolutely vital for creating a watertight seal that prevents leaks down the road.
- Panel and Trim Alignment: Eyeball the wall panels and roofline. Everything should look straight, clean, and free of any obvious dents or scratches. Make sure the trim pieces on the corners, doors, and roofline are sitting flush and attached securely.
- Doors and Windows: Open and close every single door—both roll-up and walk-in—several times. You’re checking for smooth operation. No grinding, sticking, or catching. Also, check the seals around the windows and doors to confirm they’re nice and tight.
- Anchors: Verify that the building is securely anchored to your foundation at every point specified in the plans. This isn’t just a small detail; it’s a critical safety feature that guarantees the structure’s stability for years to come.
Take your time. Seriously. The installation crew expects a thorough inspection. If you see anything that raises a flag, no matter how small, point it out. It’s always easier to fix any issues while the team is still right there on-site.
Long-Term Building Care and Maintenance
After you’ve given the final approval, the focus shifts to keeping your building in prime condition for the long haul. The good news? A little proactive care goes a very long way with a steel structure.
Just set up a simple annual maintenance schedule that includes these key tasks:
- Wash the Panels: At least once a year, give the walls and roof a gentle wash with mild soap and water. This gets rid of dirt, pollen, and grime that can dull the paint finish and trap moisture.
- Clear the Roof and Gutters: Make a habit of clearing leaves, branches, and any other debris from the roof. If you have gutters, keep them clean. A debris pile or clogged gutter is a recipe for dammed-up water, which is one of the top causes of leaks.
- Inspect Seals and Fasteners: While you’re up there, do a quick visual check on the seals around your doors, windows, and the base of the building. A quick scan of the screw lines to ensure the washers still look good is a smart move, too.
Following this simple routine is all it takes to make sure your new metal building stays looking great and serving you well for decades.
Your Top Metal Building Installation Questions, Answered
Even with the best plans in place, it’s totally normal to have a few last-minute questions as your installation day approaches. Putting up a new steel building is a big deal, and being fully prepared is the best way to make sure everything goes off without a hitch.
We’ve put together a few of the most common questions we hear from customers. Think of this as the final rundown you need before our crew pulls up to your property.
How Long Will the Installation Actually Take?
This is easily one of the first questions everyone asks, and the honest answer is: it depends. For a standard garage or carport on a properly prepped site, our crews are incredibly efficient and can often get the entire job done in a single day—sometimes in just a few hours.
Of course, larger or more customized projects will take a bit longer. If you’re putting up a big workshop or a building with features like lean-tos or multiple framed openings, the job might stretch into a second day. The biggest wild card is always the weather. For everyone’s safety, our crews can’t work in high winds or thunderstorms, which can sometimes lead to unavoidable delays.
What Happens if My Site Isn’t Perfectly Level?
This one is critical. Our installation crews need your site to be level within three inches. If the slope is any steeper than that, the base rails won’t sit flush with the ground, which throws off the alignment and compromises the stability of the entire structure.
If a crew arrives and finds the site isn’t ready, they unfortunately won’t be able to start the installation. This usually means a return trip fee will be charged, and your project will be rescheduled. Taking the time to get your pad perfectly level before scheduling the install is the single most important thing you can do to avoid a headache.
One of the biggest misconceptions is that a metal building can’t be modified later. In reality, steel structures are incredibly flexible. With the right planning, you can easily add length or width in the future, making them a fantastic long-term investment.
Can I Make Changes on Installation Day?
Once your building is manufactured and loaded on the truck, the design is officially locked in. Every panel, beam, and screw has been pre-cut and drilled to match the exact blueprints you approved. Because of this, it’s just not possible to move doors, windows, or other framed openings around on installation day.
This is exactly why we put so much emphasis on the planning stage. Double- and triple-checking every detail on your final plans before you sign off ensures the building that shows up is the one you’ve been dreaming of. For a better idea of how all these details come together on the final invoice, you can learn more about what goes into the average cost of a steel building.
At Icon Steel Buildings, our goal is to make your installation experience as smooth and predictable as possible. If you have more questions or you’re ready to start planning your perfect building, visit us at https://iconsteelbuildings.com today.